Apr 13
Mordheim Raised City Section
I got in a new computer the other day from Dell, and it came surrounded by two large sections of packing foam. Each section is 21″x18″x3.5″ and almost completely flat on 5 sides. These will act as a perfect raised part of Mordheim, and when placed on the (48″x48″) battlefield, they will take up less than 1/4th of the playing area.
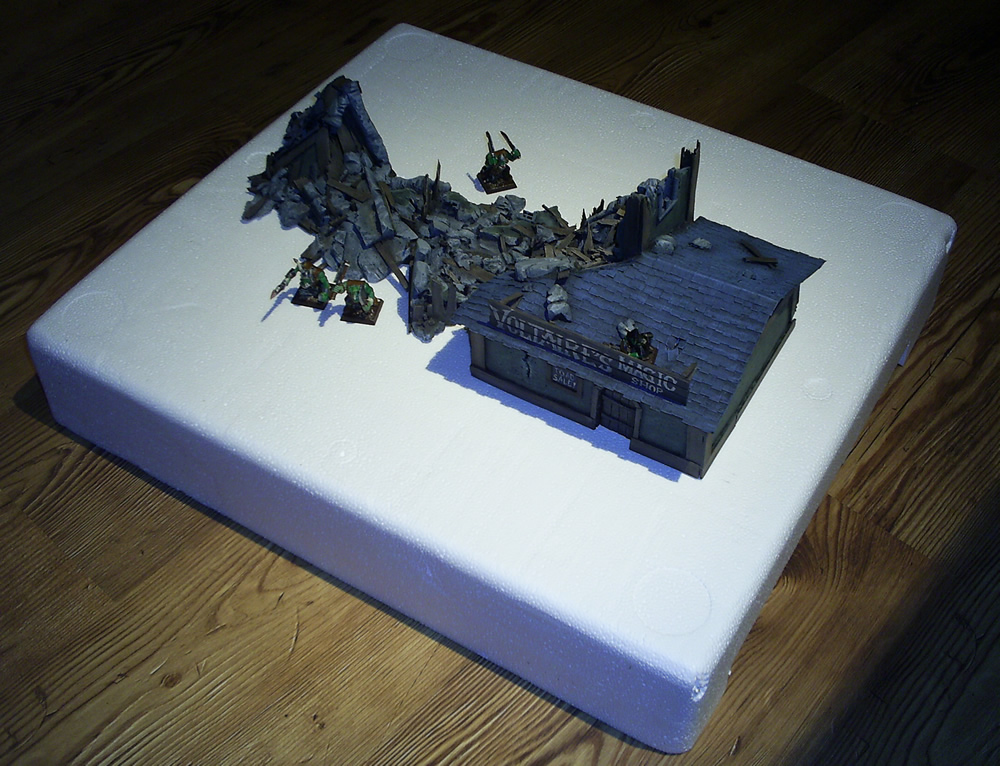
(A couple Orcs and Goblins and my Collapsed Mordheim Tower for Scale)
These are perfect because they don’t take up too much of the playing field, but can add some great elevation to a Mordheim board. My plan is to cut four sets of stairs into each section of foam so any warband will be able to access the “high road”, and make the edges look like they were built with bricks and large stones. I will be texturing the top section, and then leaving it empty so each new battle can have different Mordheim buildings/terrain on it.
Hopefully more on this project soon,
-Ashton Sanders
Mar 16
Mordheim Building Base Coat
I have done my second base coat on my Mordheim Dice Tower.
I painted most of the inside of the dice tower because I am planning on having a number of holes in the exterior that will allow you to see inside as the dice roll by. I have already cut one of the window holes all the way through. I needed to paint the inside of the tower before I put the roof on, so I went ahead and base painted everything I could.
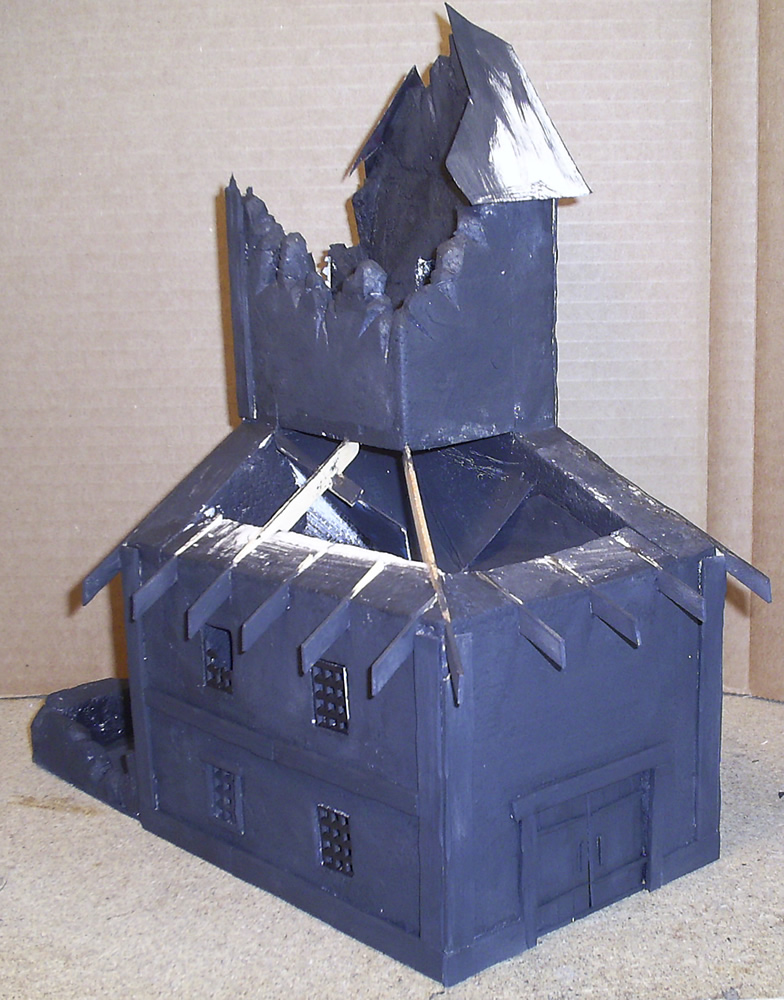
I didn’t really have a plan as to how many windows I wanted to cut into this building. I have kind of decided that this building was going to be a tavern. It could definitely pass as a tavern, and since most taverns have a back alley/dump section which no windows face, I thought this was a perfect excuse not to make any more windows. =)
To frame the windows, I’m planning on cutting tiny strips of Popsicle sticks, which is going to be a royal pain… So the fewer windows the better.
Next step is the roof. I have decided to permanently glue the roof down. I was toying with the idea of using magnets to secure the roof, so I could remove it to fix anything that might go wrong on the inside of the building. I just have very grand plans for the roof, as I want to to be as playable as possible, and since players will not be allowed to go inside of it, making the roof playable is my only real choice. Now that I think about it though, the dice going through the dice tower make it rumble and shake a lot. So I may have to scratch that idea.
Only the future will tell,
-Ashton Sanders
Jan 14
Highlighting the Cement
Although Cement is normally thought of as a “dull” material, sunlight gives just about everything highlights. After I gave my pile of rubbles a good think brushing of Dark Gray, I drybrushed it with subsequent coats of lighter and lighter gray. Each times the color got lighter, I used less paint and didn’t press as hard with my brush. This gave the impression of highlights on the edges of the cement.
Hover over this Picture to see the Before and After Differences:
Here are four different angles of the pile of rubble now: Read the Rest of the Post >
Dec 28
Adding Bases to Terrain
Since my last post about adding bases to buildings, I’ve done a lot of thinking about it. I’ve compiled more points, and put them below:
Good Things About Using a Base on Your Buildings and Terrain:
- Stability: With a base, you don’t even have to worry about the stability of your large building. Just glue it down.
- Debris and Junk: Read the Rest of the Post >
Dec 21
Mordheim Roof Updated
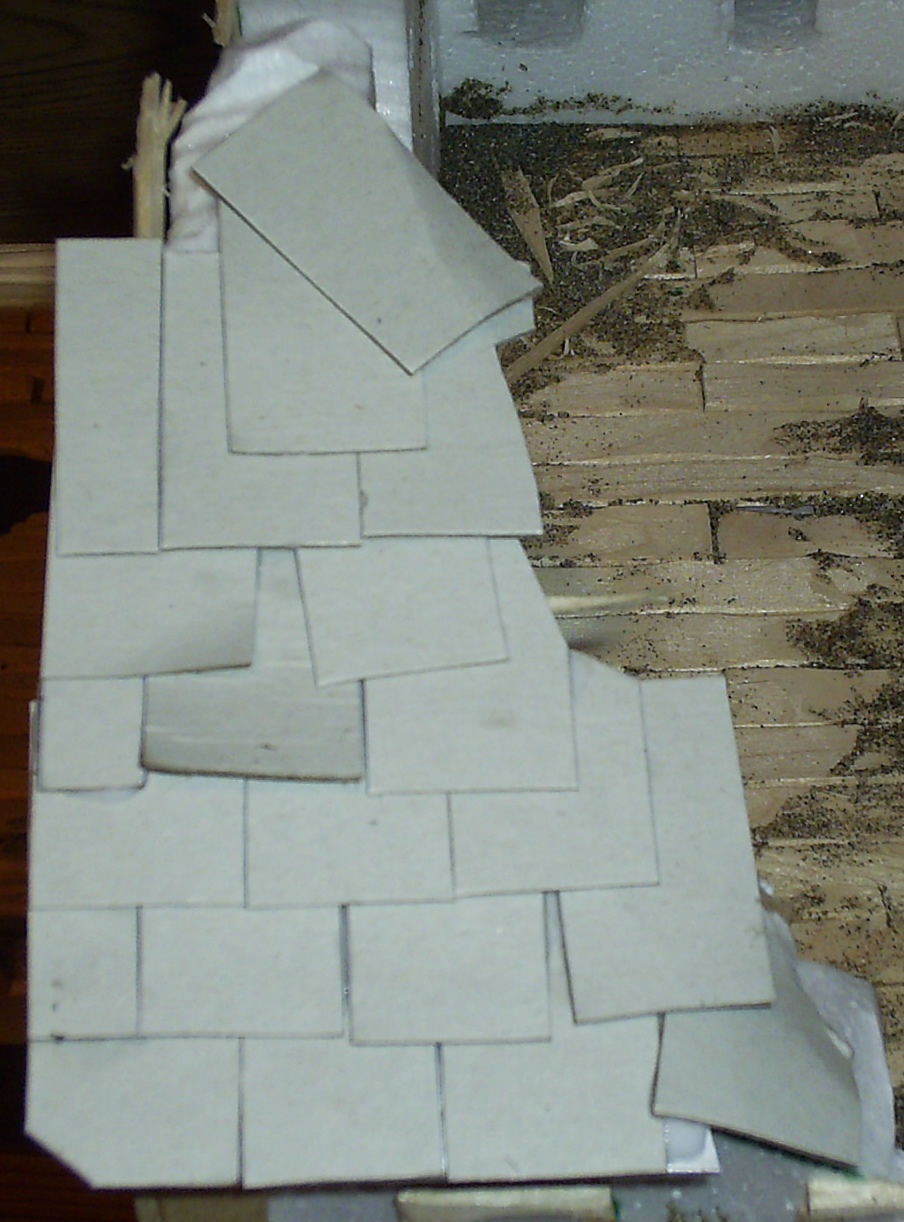
Over the last week, I’ve been trying to create a system to create small Mordheim roof tiles that look good. Most scratch-built Mordheim buildings these days have 1/2″ to 1″ wide roof tiles which translates to 2.5 – 5 feet wide. Which, by the way, is completely ridiculous. After lots of fiddling with different types of material for my roof tiles, I tore off my old Mordheim Roof and created a new one from card stock.
This is the process I created to make the Mordheim roof tiles:
- Cut a strip of card stock 1.1 cm wide.
- Cut slits along one side to create the different tiles.
- Then I cut off the ends of most of the tiles to give each tile a different length.
- Then for to show wear, I bent the tiles and chipped the corners of every other tile.
Here’s an image of the different steps:
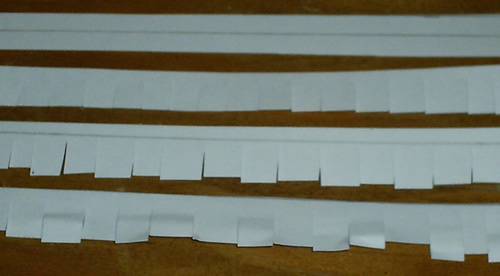
As you can see the completed strip has as much character as I could think of adding (without paint). So I went ahead and cut up almost an entire 8×11″ piece of paper and glued them down on the roof of my competition building:
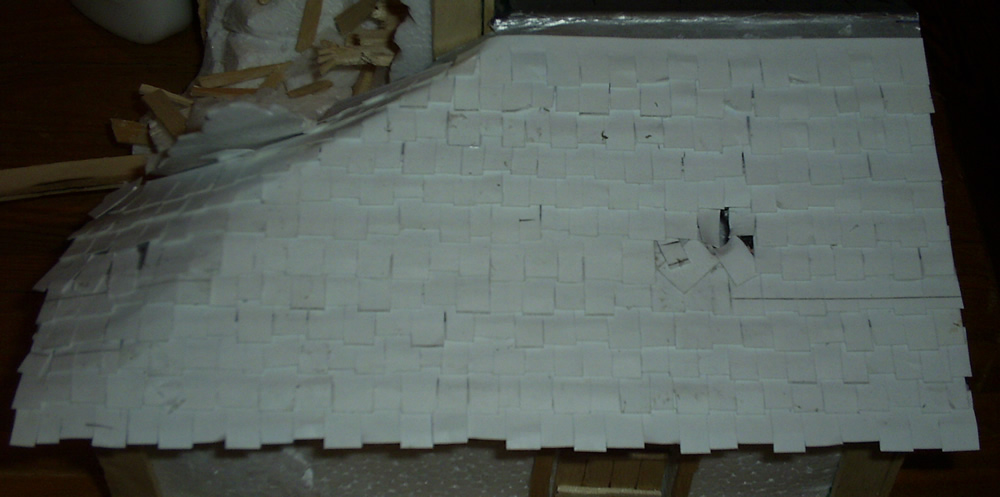
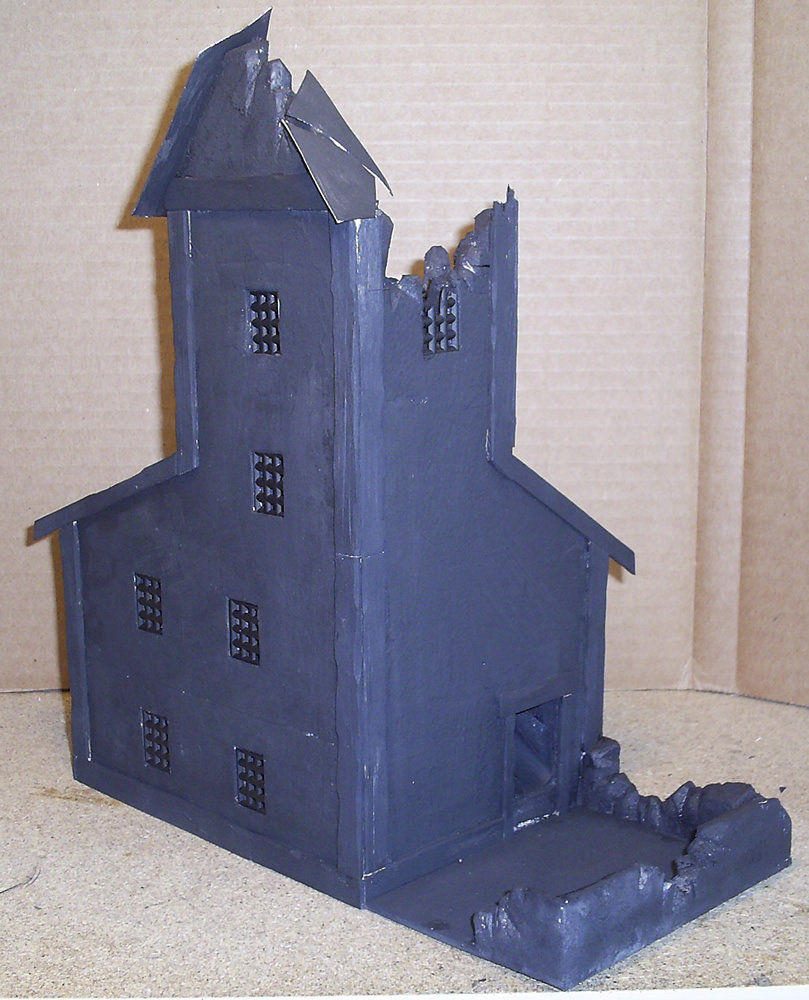
Here’s the other side:
Note the two holes I added to create the leaky roof. I think this came out looking very well. I only have one row of tiles along the peak of the roof to add, and This section of roof should be done.
The only short-coming with using card stock is that it will soak up the paint and become wet. Hopefully it won’t “melt” together and loose it’s shape.
More to come,
Ashton Sanders
Dec 19
New Roofing Tiles
My latest work has been on my Competition Entry for TerraGenesis.com.
I have a couple of minor details to work out before completing the construction phase of my project and moving on to the painting phase. One of the biggest problems I’ve faced is getting the roofing tiles to work. In almost all pictures of Mordheim roofs that I have seen, the roofing tiles are about 1/2″ wide. Which translates into almost 2 1/2 feet wide in Mordheim size. There is no way that most buildings (even in fantasy) would have roof tiles 2.5 feet wide! So began my quest for smaller roofing tiles.
I got a deck of mini playing cards for Christmas and cut those up into rows of roof tiles. This is where I ran into my problem: The playing cards were so laminated, paint wouldn’t stick to them. I tried everything I could think of, and asked for help at the TerraGenesis forum. Unfortunately nothing could solve my problem until I realized I could find a similar material that wasn’t laminated: Card Stock. I even had a couple sheets in my laptop bag!
I cut up one row of roofing and glued it down tonight. I’ll be adding and update about it tomorrow.

Enjoy,
Ashton Sanders
Dec 8
Mordheim Roofing Contractor


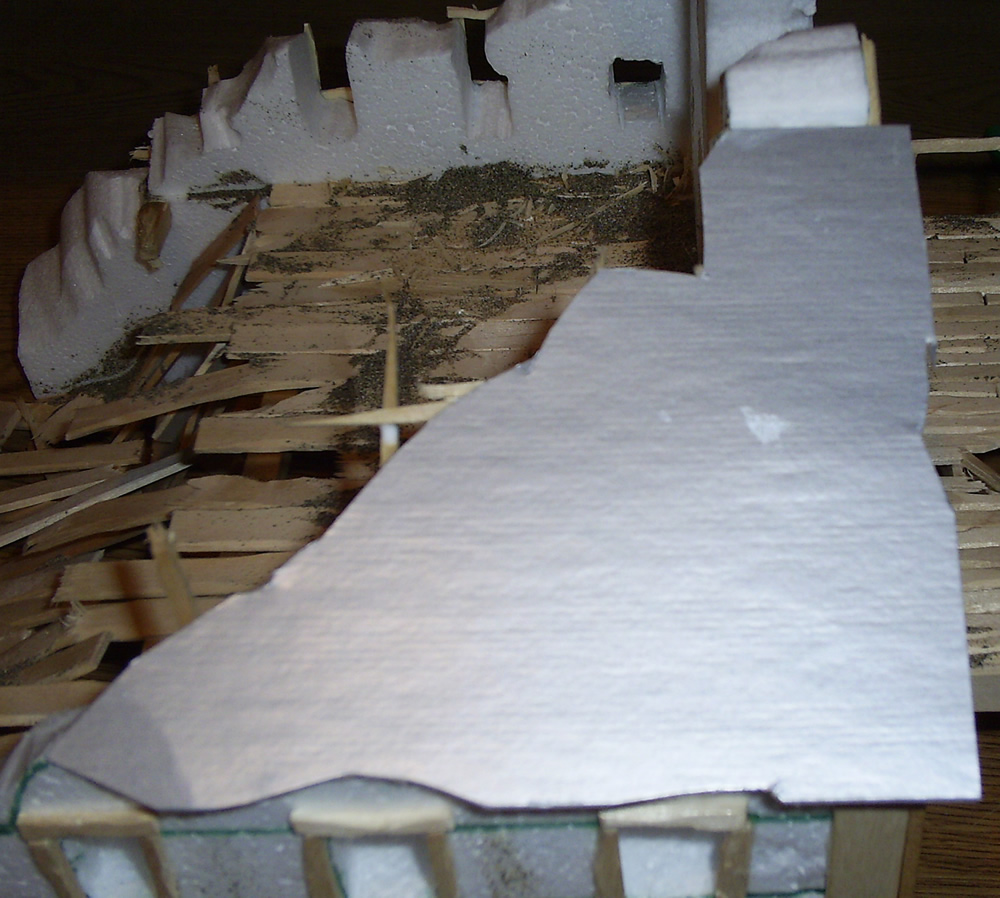

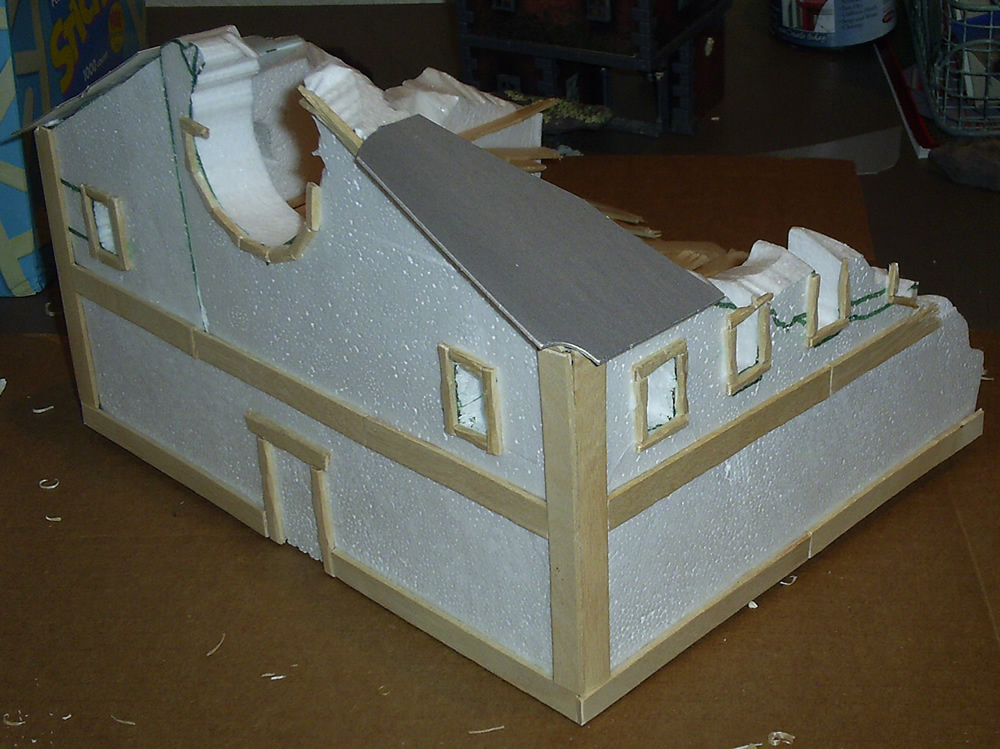
Finally the roofing contractor was called out to finish roofing the church. I’ve seen a number of different types of roofing tiles in Mordheim, and I decided to try this style out and see how it goes.
When I was making the building, I added a couple sections of triangle board to the corners of the roof to use as the roof’s “foundation.” This is actually what holds it all together. I added some wooden cross-beams to the inside for some realism. (Made out of Popsicle stick splinters.)
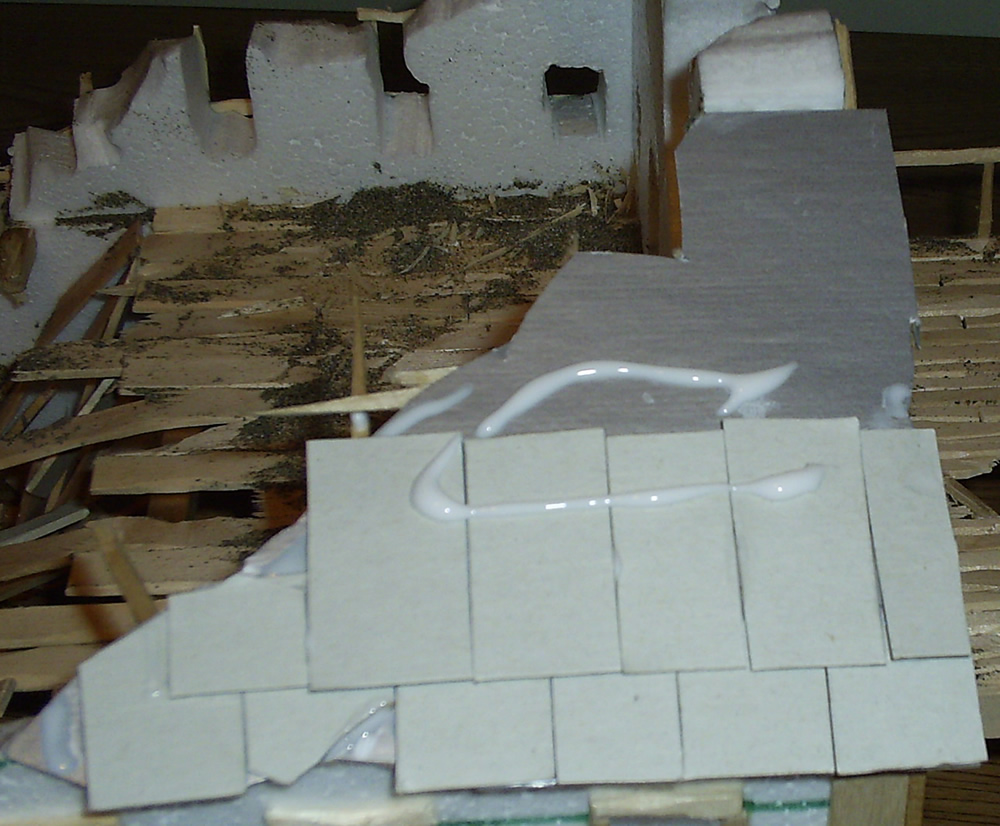
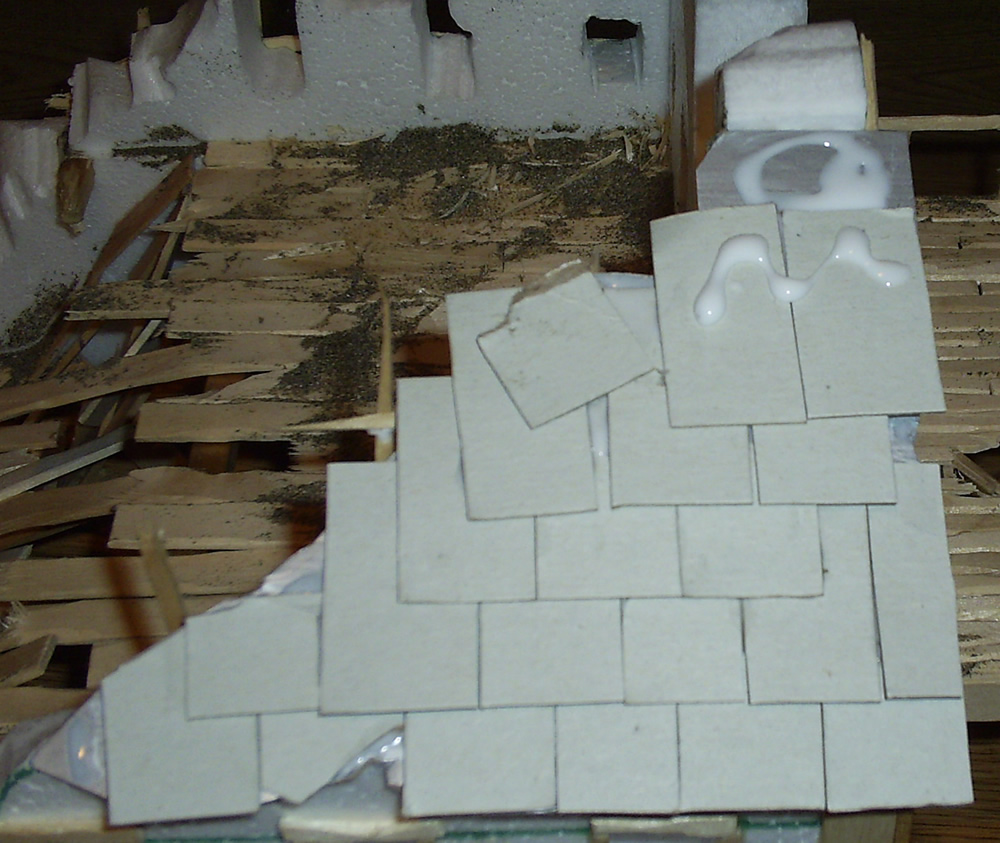
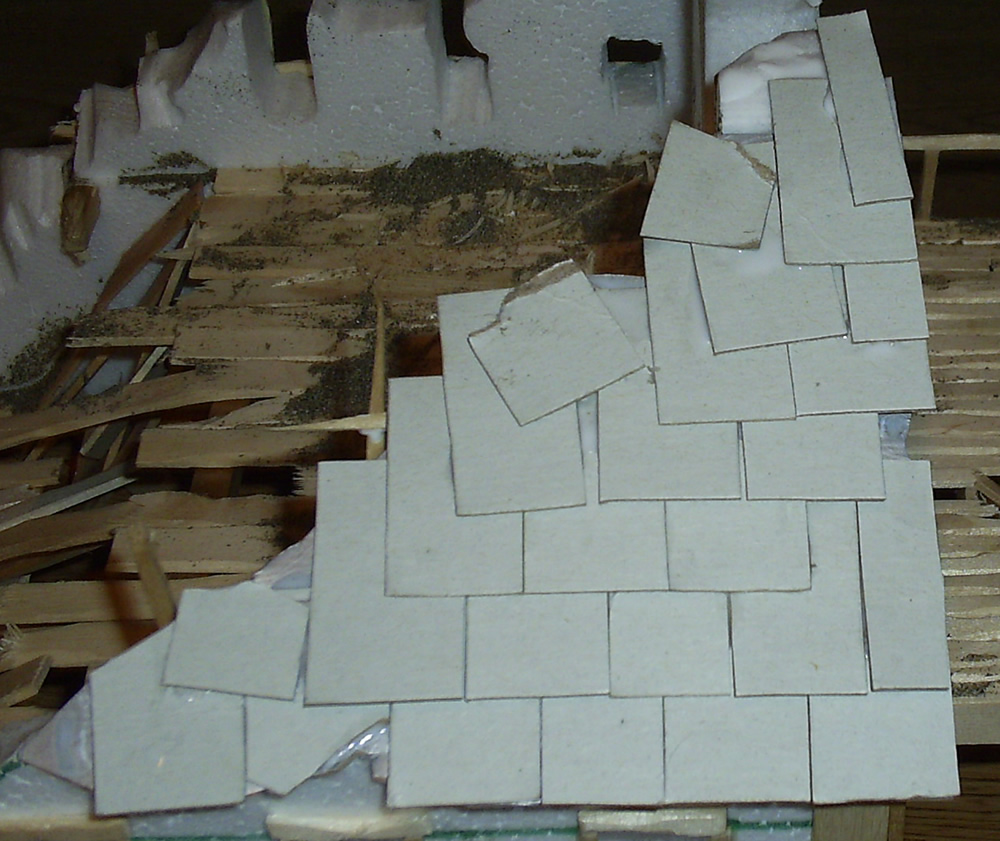
Then it was time to create the roof tiles. I didn’t have any really plan, so I went with my gut: I cut out a rectangle of a Bed, Bath and Beyond box that I had lying around, and cut it into 3/4″x 1.5″ strips. A lot of them came out with slightly different dimensions, but I guess that’s what happens when you hire the least expensive roofing contractor in the business. (I’m doing it practically for free.)
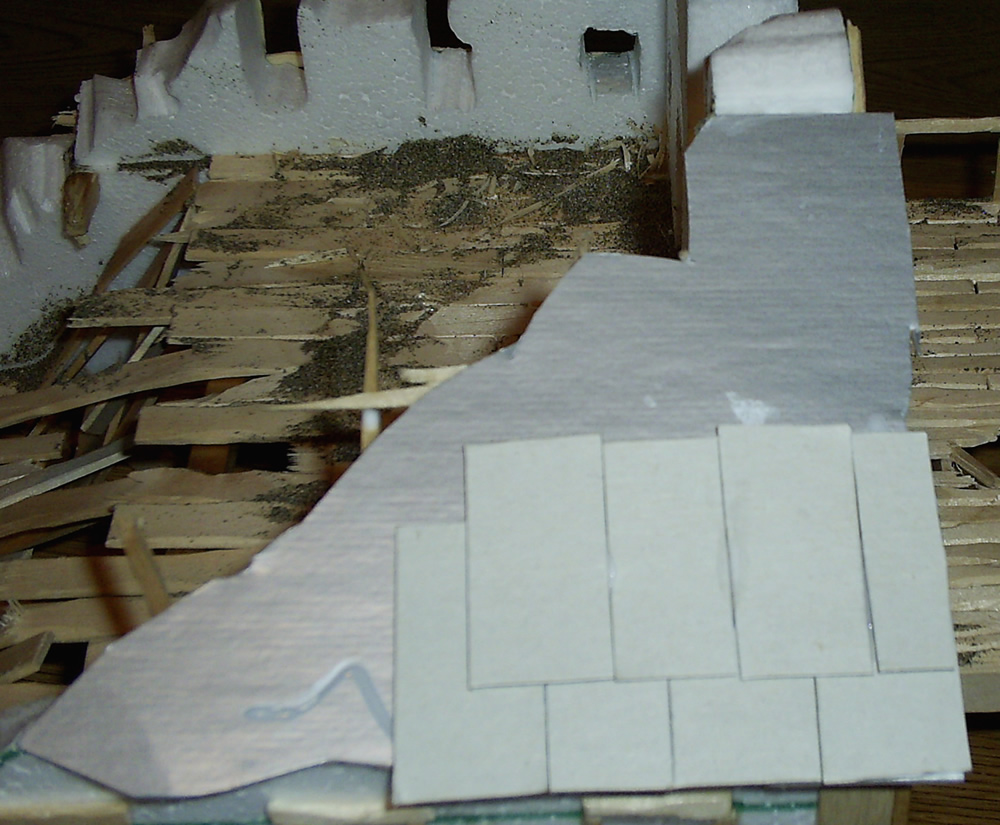
After cutting the tiles to size, I proceeded to glue them down with a good helping of Elmer’s glue. You can see the progression of adding the tiles to the right.
You can click on any of these Mordheim pictures to see a larger image.
I tried to make most of it look as professional as possible; except for some of the edges where the tiles needed to be destroyed or missing. I think I did a pretty good job of breaking, removing and destroying this Mordheim Building’s roofing tiles. One thing I realized after I had completed this roofing project is that some of the tiles should be curled up at the ends. I did that after I took the pictures, so you’ll see that in the next couple posts.
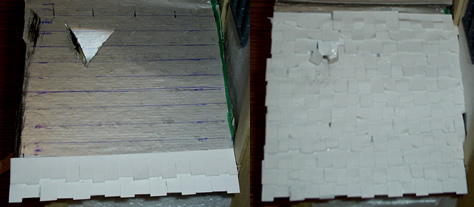
I did the other side of the roof as well, except I only did a before and after picture. You can see those here:
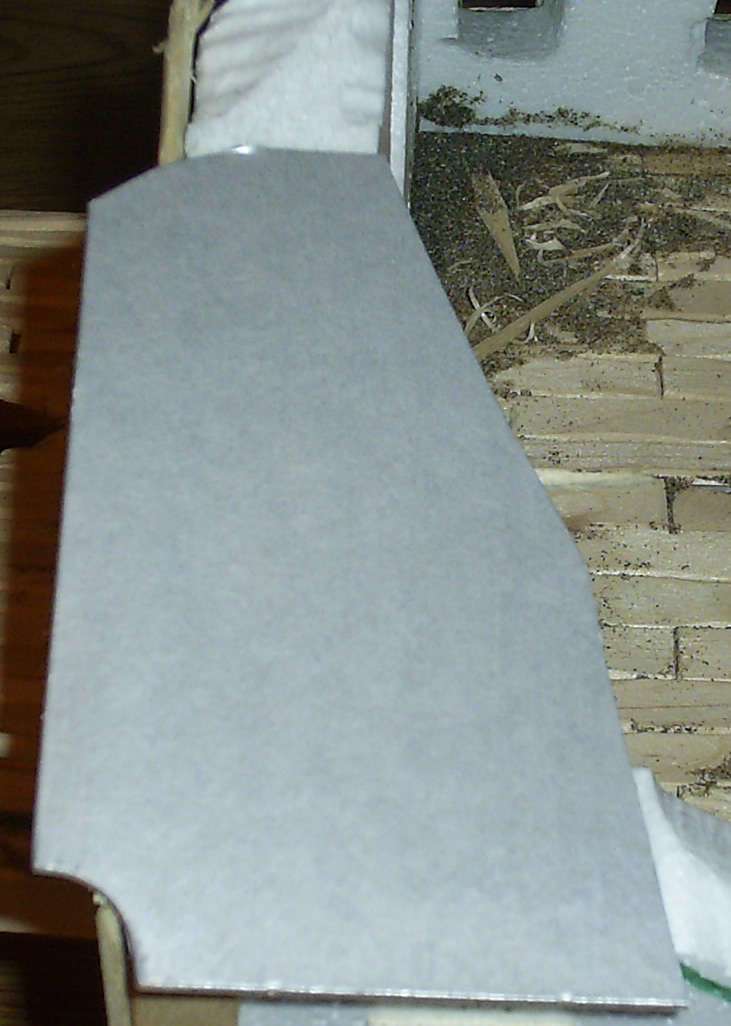
After:
I hope other Mordheim roofing contractors find this useful. If you know of any easier/better way of roofing Mordheim buildings, let me know.-Ashton SandersEDIT 12/9/07: Looking back on these tiles, I should have made them much smaller. At 28mm, these tiles are almost as big as a human… =/ They look fine when you’re not comparing them to anything, but I wanted to add a fallen tile to the debris on the floor and realized it was too freaking big; it looked like a door was sitting on the floor.
More to come.
Dec 4
Mordheim Terrain Competition
In my daily perusing the Internet, I came upon a website with lots of good content (and web ranking).
Terra Genesis has a new terrain competition that starts every month and lasts for two months. So at any given time, they’ll have two competitions going at the same time! Then all the visitors vote on the best completed submission. If you like to create Mordheim or just plain miniature terrain, Terra Genesis is a great website community to get hooked up with!
Right now, they don’t have any good competitions that I could build a Mordheim building (or terrain) for, but they should have another Competition starting on the 10th (of every month). I’ll see if I can do anything for the next competition.
I’ll keep you posted,
-Ashton Sanders
Dec 2
Framing the Mordheim Church
 Today I worked on framing the windows. I even decided to start framing the large circular window.
For these windows, I just cut a Popsicle stick into lengths of 1″ and 1/2″ and then cut those pieces into three (lengthwise). This gave me nice, thin and short pieces of wood to use as framing. The circlular window was framed with 1/2″ lengths with slightly slanted edges (to make the circle).
You can also see in this picture the gray boards I put in place for the roof. They will be used as the foundation to add the roof tiles too.
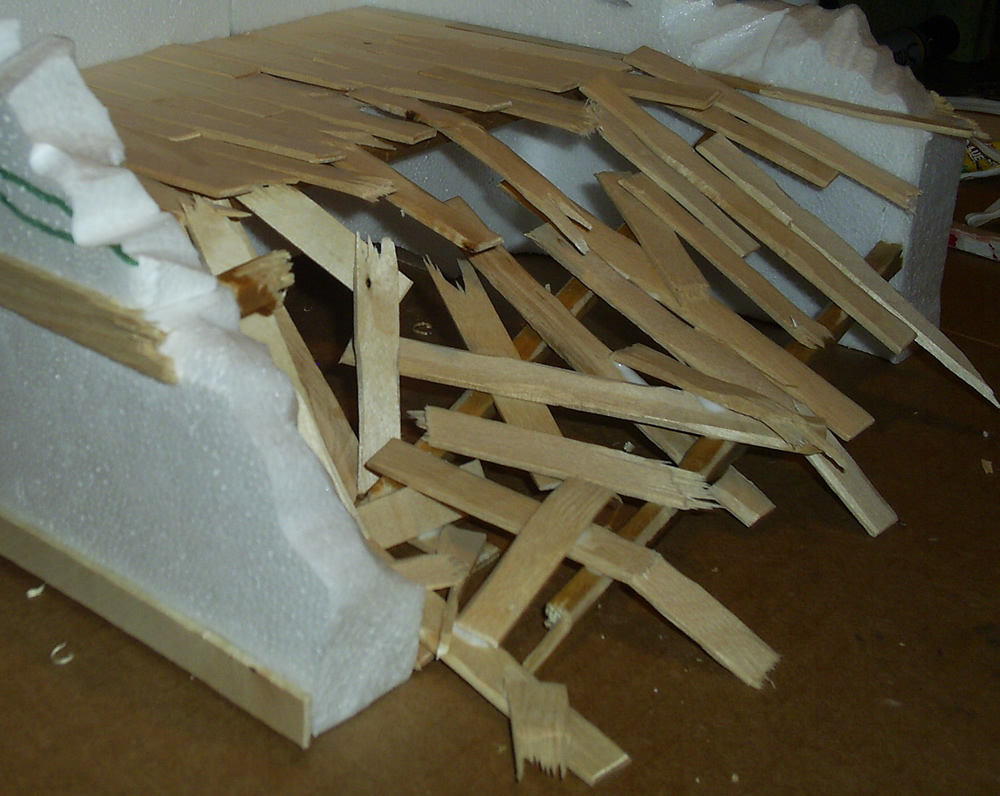 Here’s another side view of the destroyed floorboards.
As I’m writing this, I’m realizing that this building only has one entrance/exit. It very well may not be used very much because of that. I think the best handling would be to make another entrance/exit on the front. I could destroy a portion of the front side of the building, or I could possibly make a second story deck on the front. That would create a door that units could come through. It would also add the character I was looking for to the front of the building. Yea, I like that idea a lot. Let’s see how it goes.
-Ashton Sanders
Dec 1
Building Mordheim Church
(continued…)
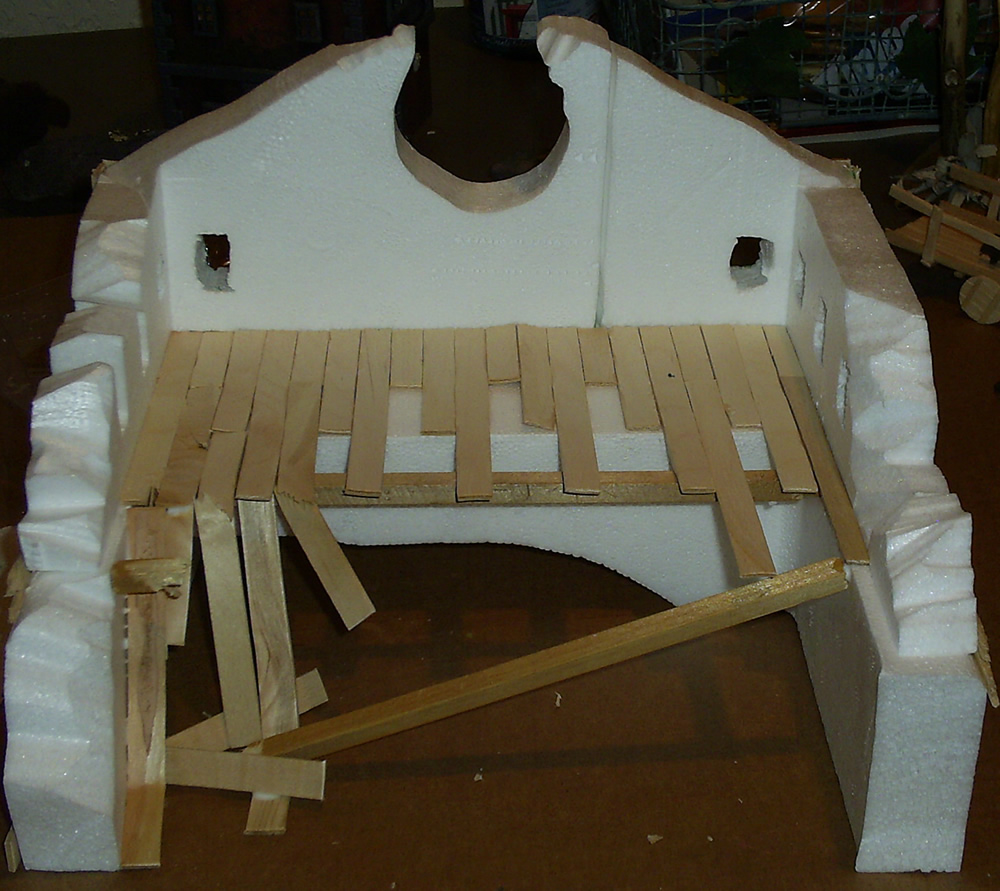
 This is my second building that I am creating for my Mordheim Board and this is my second post. I’m calling it my Mordheim Church. It isn’t going to have a (playable) ground floor. Instead, the second floor has collapsed down upon it in most places. Here are a series of images as I go through the process of creating a destroyed wood-panel floor. You can click on an image to enlarge.
The idea is that a piece of the meteor crashed through this building, and destroyed the back wall. This also caused the second story floor to collapse down onto the first floor to create a sort of ramp. This will create an easy way to get up into this building from one side only.
 Now to begin construction!
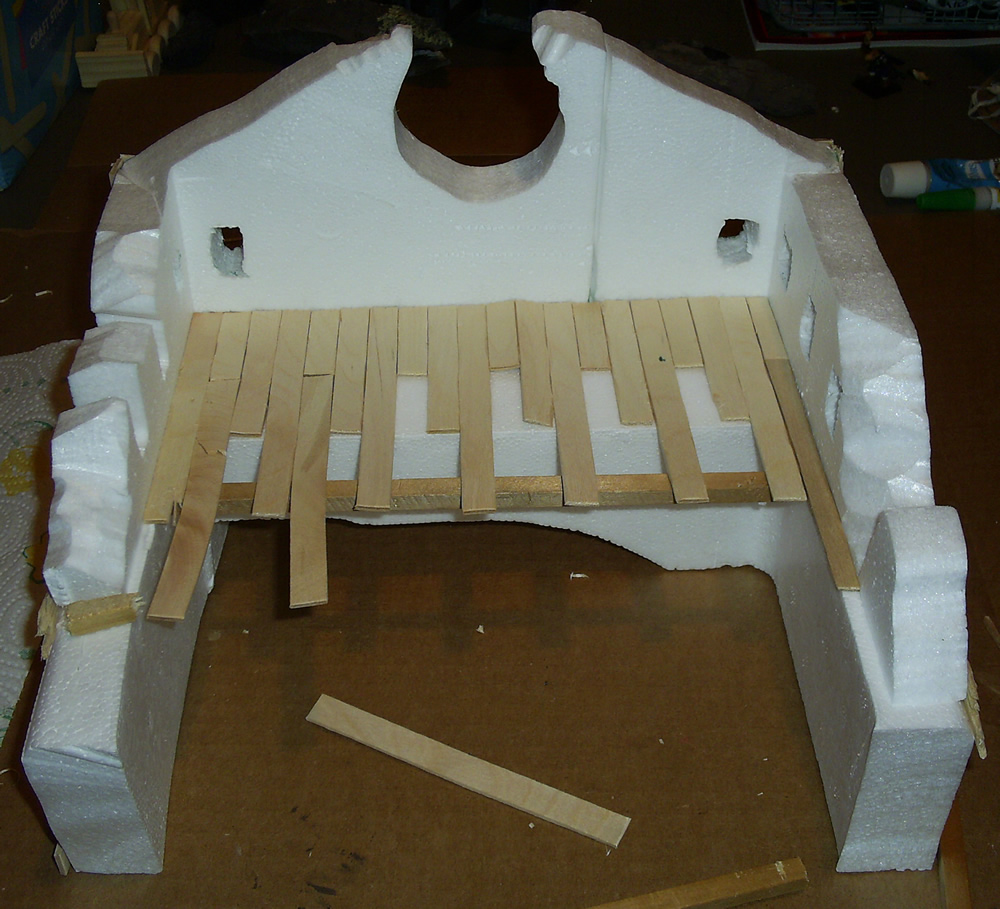
The first part of creating the floor was easy. I first cut the rounded ends off of 50 Popsicle sticks to use as Mordheim-sized floor boards. Then I cut seven of them into 1/3 and 2/3 sections. I glued the floor boards into place in a staggering manner:
Full length, 1/3, 2/3 and then back to a full length board again. This is a pretty normal construction method for normal houses. It makes the floors look nice and space the “seams” out so they aren’t so noticeable.
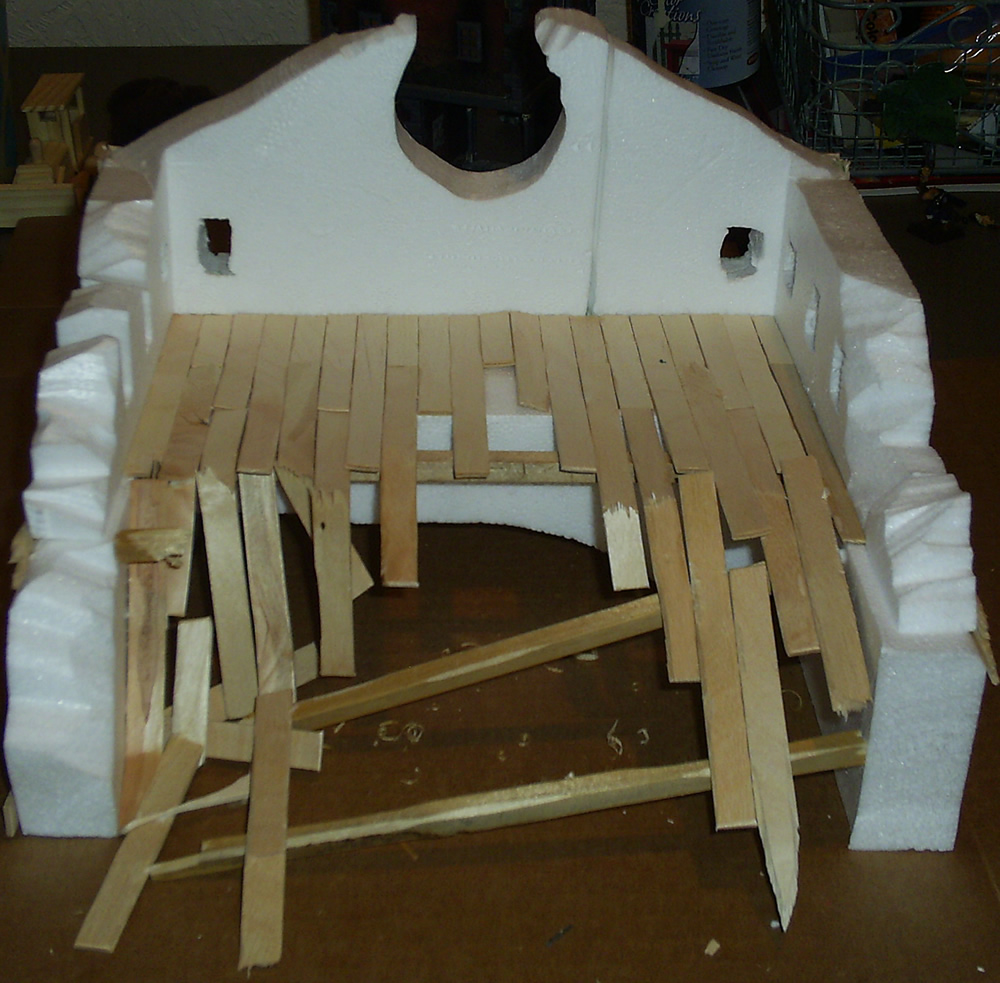 I will also mention that before I put any board down, I ran my sharp knife over the edges of it to give it a beat-up look. That’s a trick I learned from a Terra Genesis article on preparing wooden beams for Mordheim. They used balsa wood, as it’s a lighter wood and easier to cut/work with. I use Popsicle sticks cause it’s 1/20th the price. =]
I added some crossbeams from a stick to a firework that a friend had left at my house (after launching the firework of course=]). I added three crossbeams. One is still intact at both ends, one is broken only on the left side, and the last has completely collapsed.
No Base! I had discussed whether to use a base or not for my Mordheim buildings. Probably the biggest reason to use a base is to make it easier to build the building (and add rubble to it) without it falling apart. I took this as a challenge to build this building without a base! 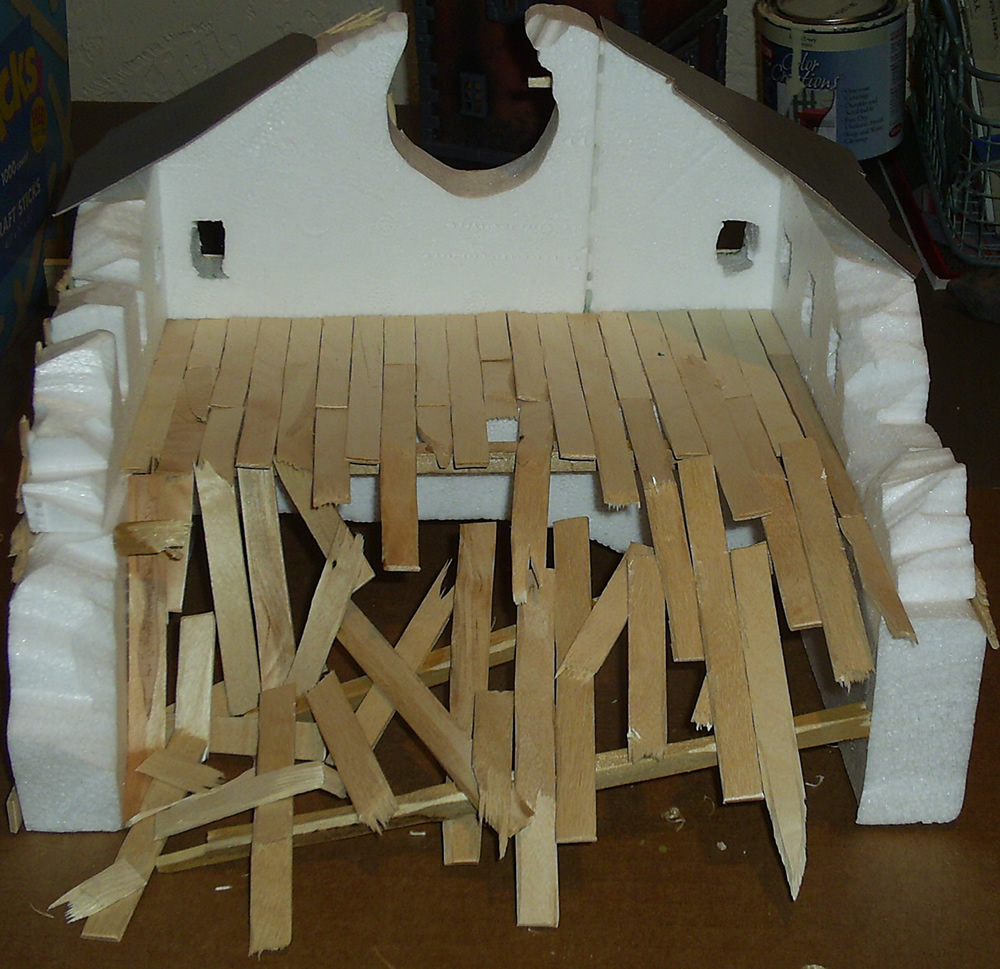 All of the destroyed Mordheim floor boards are glued together to create a firm, invisible base that holds it all together. So even though it looks like all those boards are about to fall to pieces, they are actually quite sturdy.
Now that I have finished this part, I have a little more wood framing to do for the windows and roof, and then I’ll be doing some final touches to make it look realistic.
More on it’s way!
Ashton Sanders
