Jan 2
Making Rubble Look Real
Here’s some tips to making a realistic looking pile of rubble!
Most of the work I’ve been doing on this tower is detailing the pile of rubble. I noticed that on this competition entry on TerraGenesis.com, they made a pile of rubble to cover the batteries for the LED lights. This is the pile that he made:
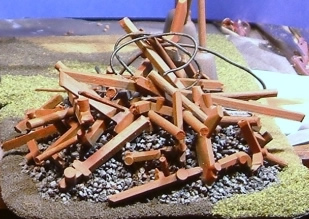
To me, this is a pretty ugly pile. I found that the reason is because the pieces of wood are on top of the gravel as opposed to in the pile. So I started making sure that my pile of rubble was very realistic. I’ve done about 4 hours of detailing work on my pile of rubble to make it look as real as possible. I’ve been filling in any deep crevices with glue and pieces of wood and foam. I filled the holes with glue and then covered it all with sand. After it dried, I shook off all the excess sand.
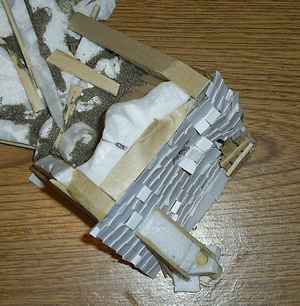
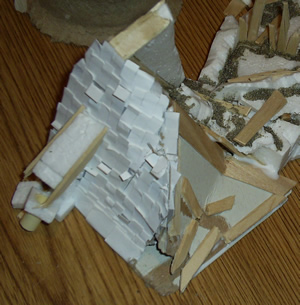
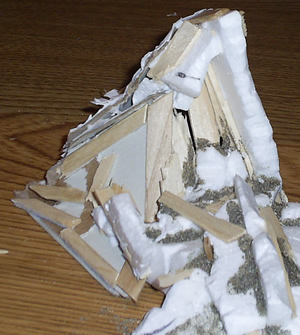
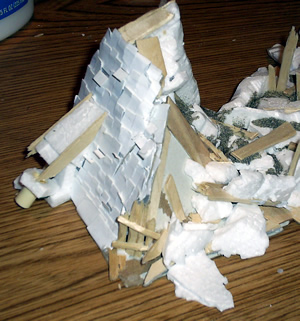
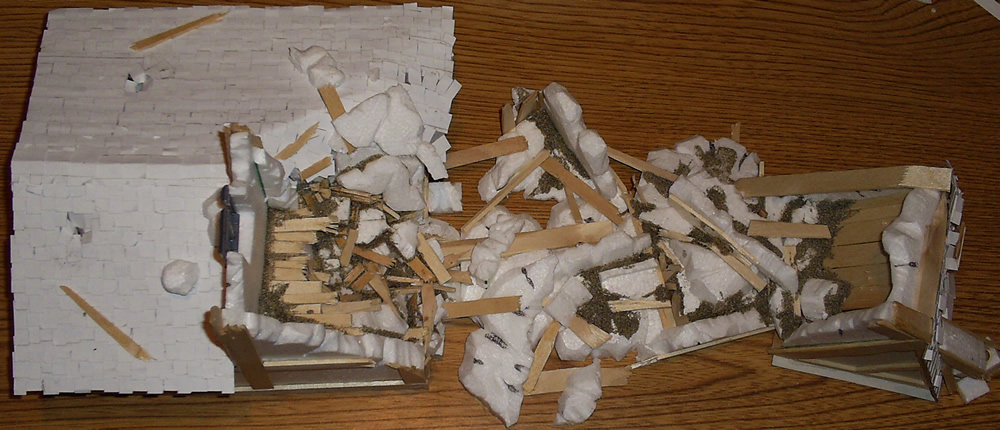
Here’s some pictures of the updates:
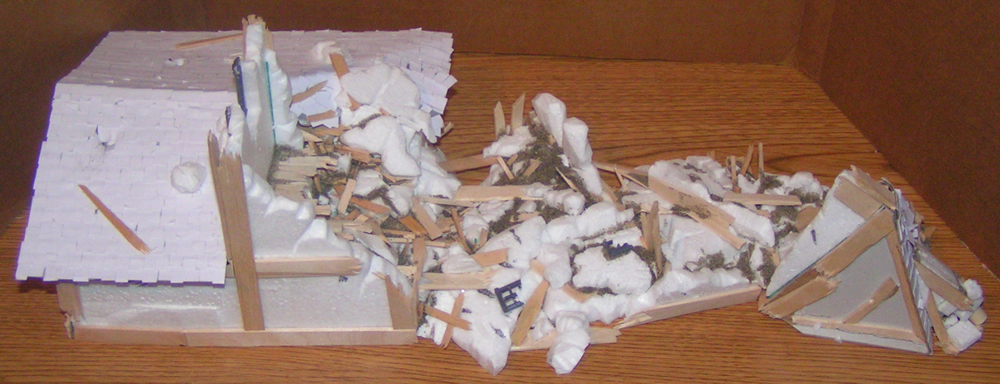
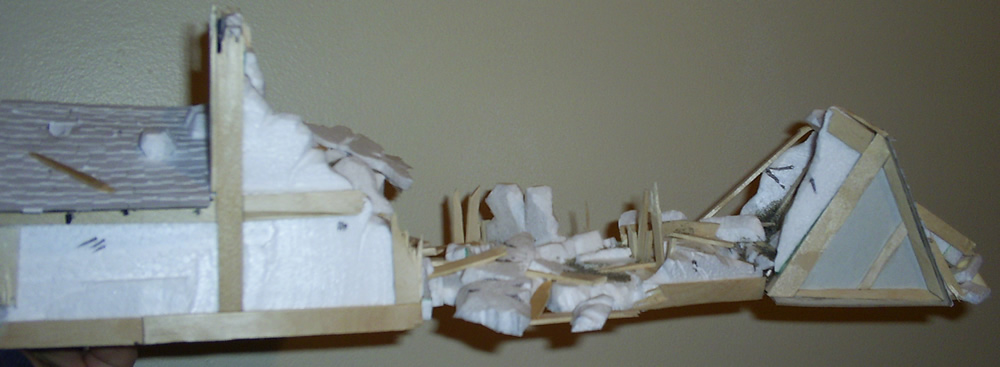
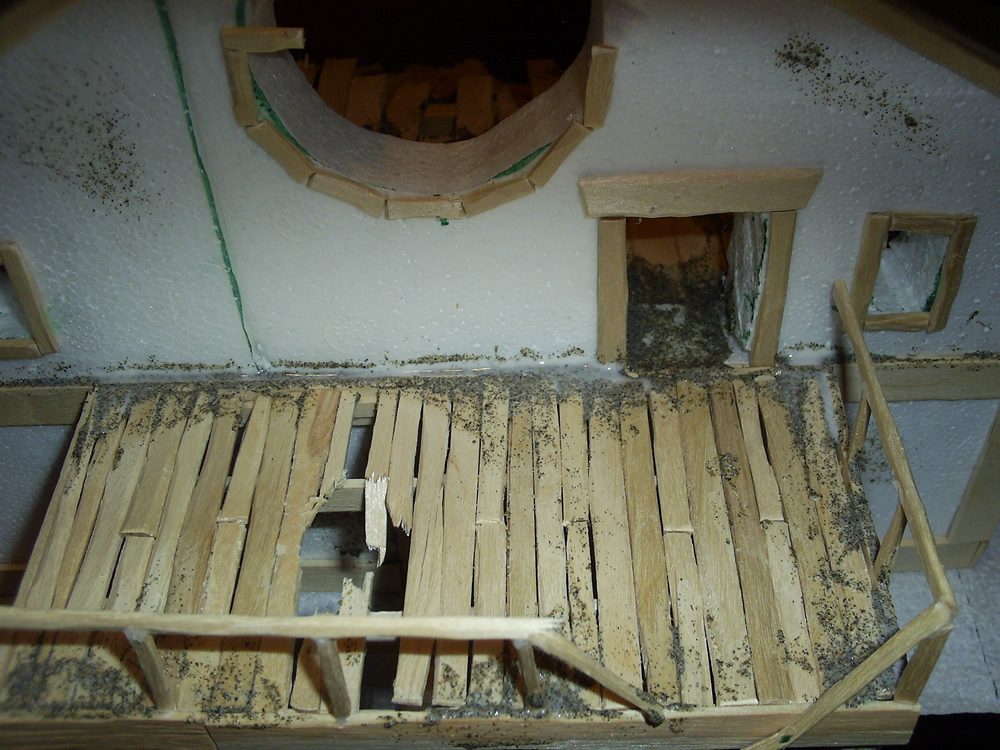
I also added a destroyed window frame to the rubble, You can see it still attached to a piece of wall in the rubble.
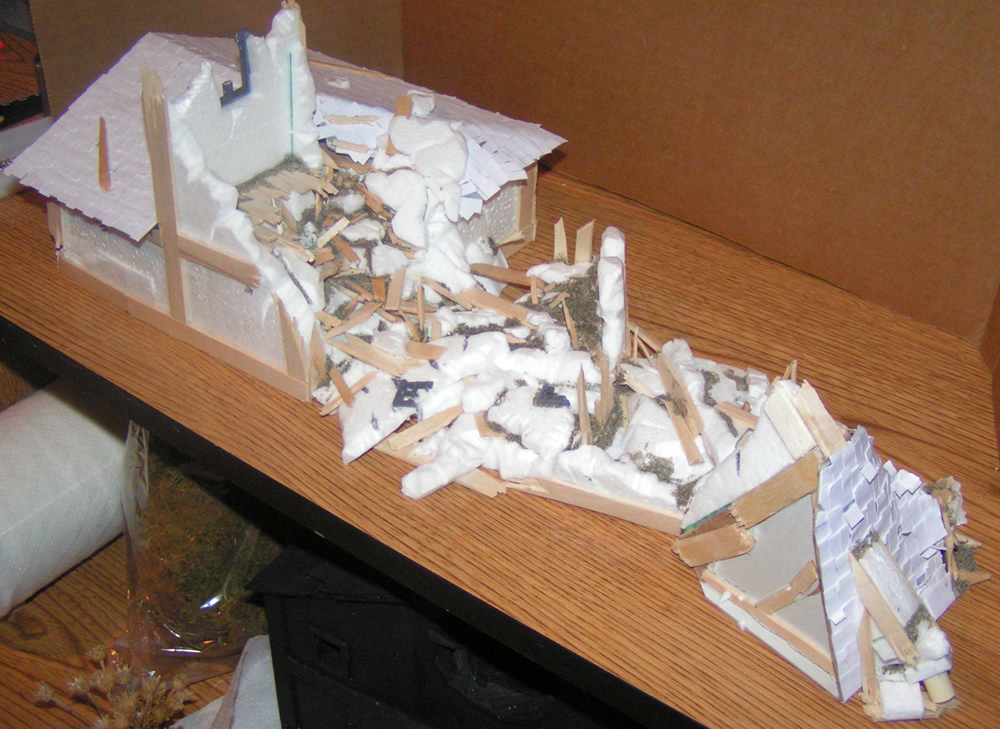
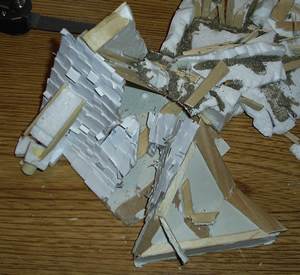
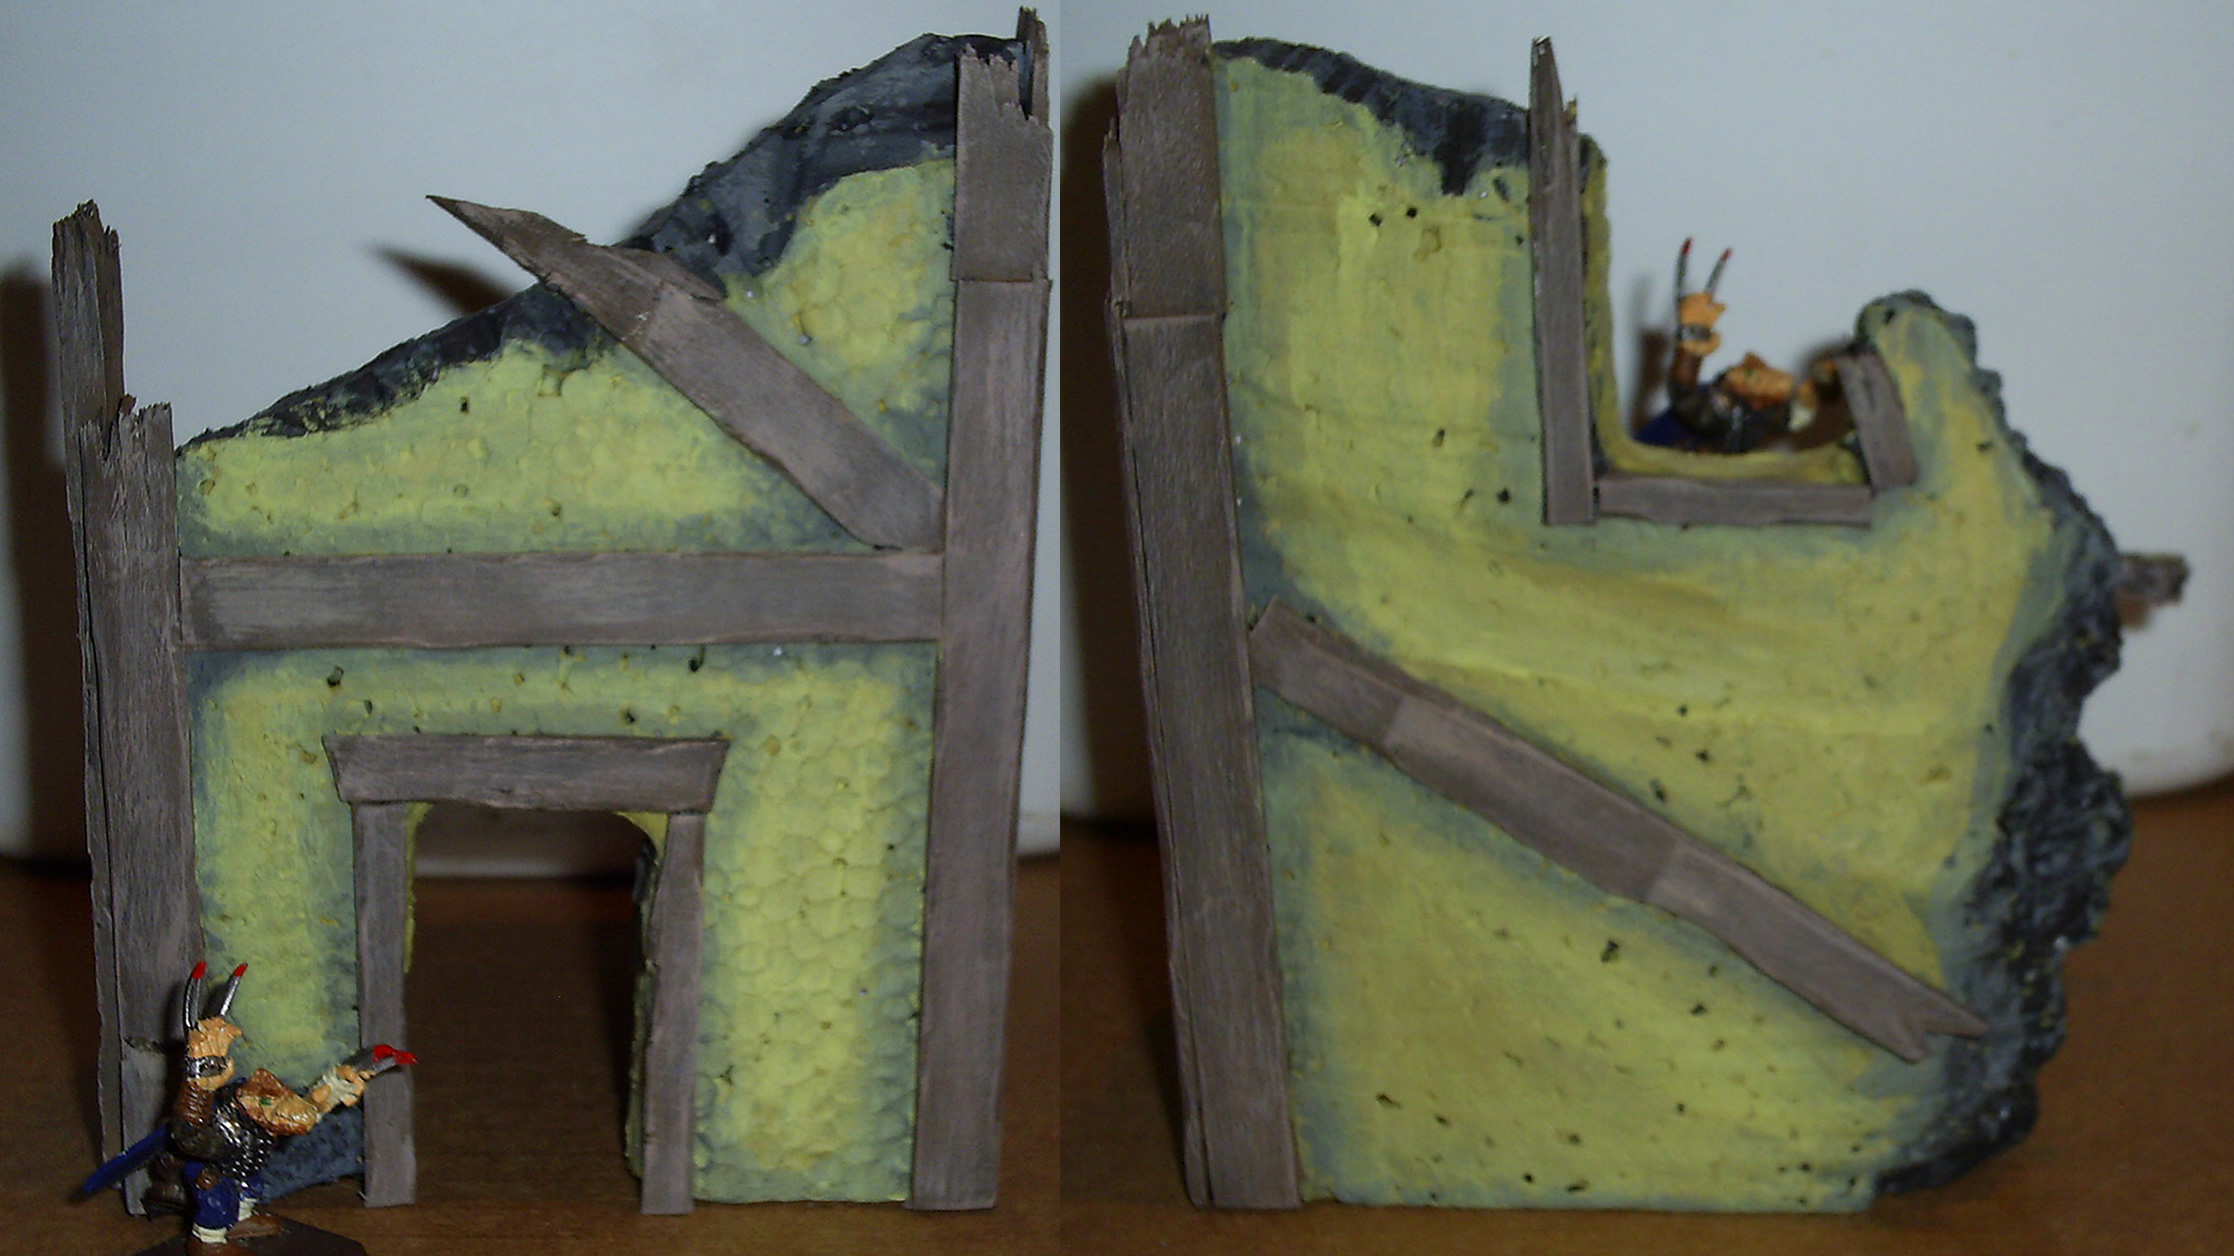
Here is a close up of the collapsed tower roof.

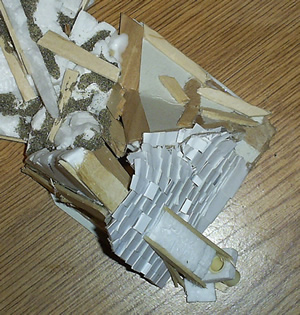
Here is a close up of the pile of rubble at the base of the building.

I hope this will help you to make great piles of rubble. =]
Enjoy,
Ashton Sanders
Jan 1
How to Destroy a Roof
I have been working on my collapsed tower for some time now. I’ve gotten a couple comments mentioning how the roof of the tower, which fell four stories and crashed into the ground, is not destroyed enough. This is how it looked when I first create it:
That obviously is not a roof that fell four stories, so I decided to fix that. Here is the process I took to destroy my perfectly good Mordheim Roof.

Then I glued it bent the detached section and glued it back into place:
Now I just have to do a little bit of detailing to make it fit in perfectly.
I hope you have a Happy New Year this 2008!
Ashton Sanders
Dec 27
Supporting Large Terrain Pieces Without Bases
The building that I am currently working on for my Mordheim Terrain is a four story tower that has fallen over into a pile of rubble. This creates quite a long terrain piece that I am building without a base.
The biggest problem with creating this Mordheim building without a base is support. If I am not careful, after all my work, it will just break in half. There are a couple things I am doing to take care of this:
First, I’ve created, and glued into place, a Popsicle stick brace that supports the building from inside the foam. The idea behind this is similar to having rebar inside of cement walls. Here is a picture of the bottom of my terrain:
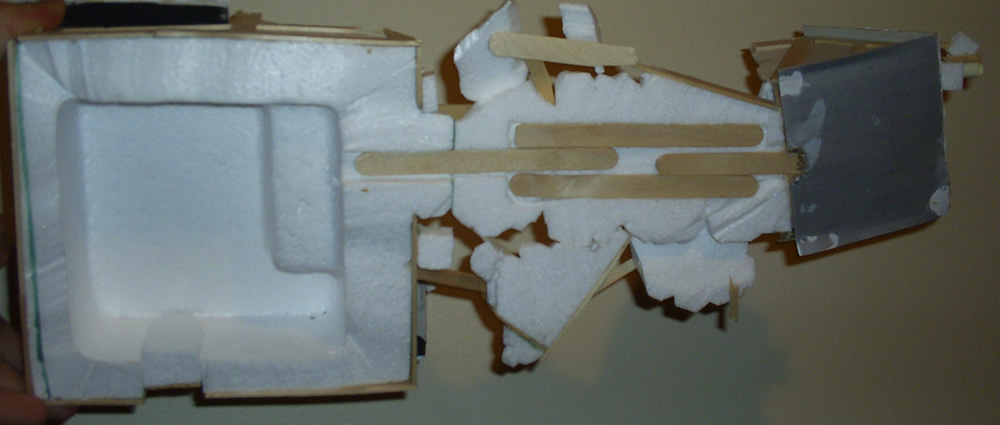
The weakest part of my terrain is on the left side of the Popsicle brace. Where the rubble meets the first floor of the building.
Second, I’ve added fallen debris that acts as support beams.
There are three sticks that look like they have just fallen over in the debris, but are actually embedded deep within the main building and glued securely to the rubble.
Lastly, I am going to create a couple piles of rubble right next to the main floor which will also add support to the weak point on my piece of terrain.
I’ve done a lot of work on the roof of the tower as well. You can see the broken chimney in this picture:
Merry Christmas,
Ashton Sanders
Dec 13
Mordheim Terrain without a Base
I’ve touched on my thoughts on Adding a Base to Terrain and my last two buildings have not had bases. As I mentioned probably the biggest Con of not having a base is the difficulty of keeping the entire building supported. This is especially true for my entry into the TerraGenesis Fallen Over Competition.
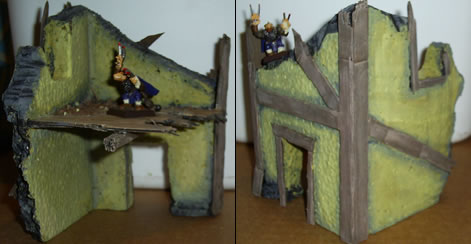
Here is the latest picture of my Entry:
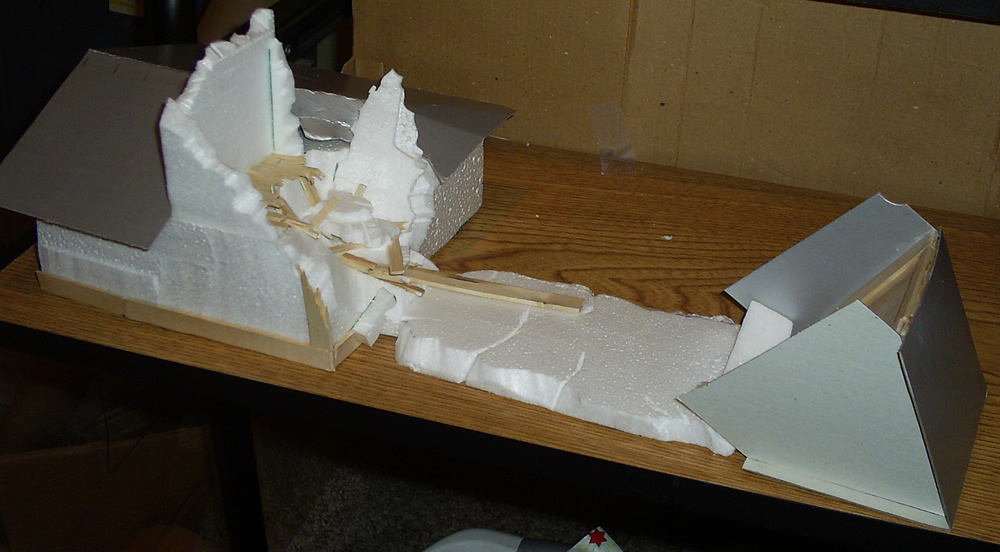
 As you can see, I’m going to have to create a lot of supports between the roof of the tower, the rubble and the main building. All I had connecting the two was a thin sheet of Styrofoam, so this is what I came up with: Adding support beams under the foam.
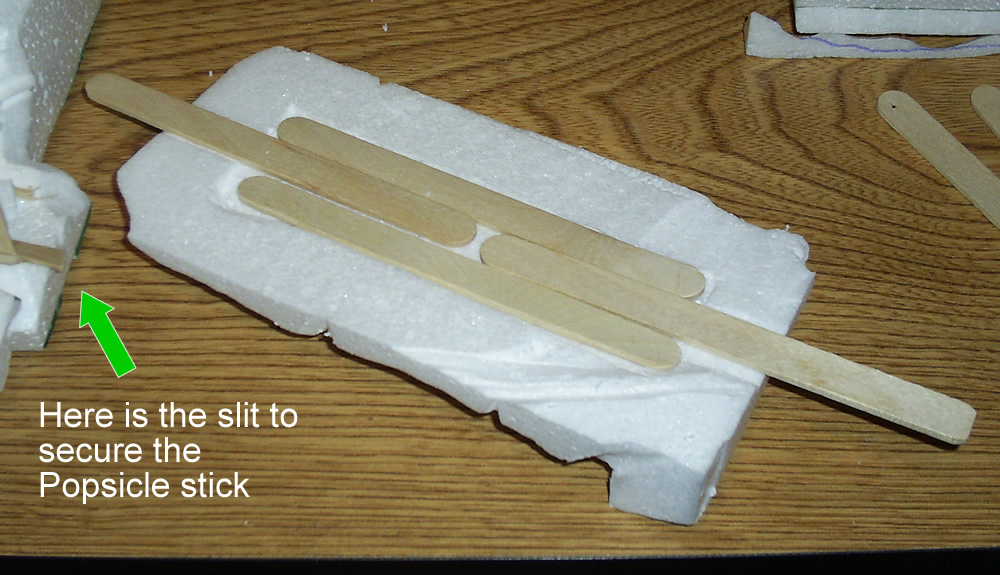
1) I cut out slits under the connecting piece of foam. I cut out enough space for two sticks to be sticking halfway out, and for two sticks to run parallel for extra support. (I did this we a fully extended (flexible) razor blade. The flexible aspect allows me to rub the blade horizontally across the bottom of the foam creating a perfect hole. See picture.
2) I cut out small slits in the bottom of the roof and the bottom of the main building; just big enough to slip in the Popsicle sticks.
3) I glued in all of these supports with Elmer Glue.
4) I am also planning on adding some supports to the top of it, in the form of fallen debris between the separate sections. They will look like they are just leaning on the main building (or roof), but they will actually act as additional support. You can see a good example of this in the first picture above.
Good thing foam is not too heavy. I think these supports will be enough to hold this terrain together.
Here’s a picture of the glued in support beams:
Enjoy,
Ashton Sanders
Dec 6
Adding Dirt/Grime to Mordheim Church
After my last post about my Mordheim Church, i still had a couple incomplete projects to work on before I can actually start painting it. I have to add some roof tiles, and some dirt and grime. It’s not like someone is sweeping the floor every other day, and since their is no roof, the wind and rain filled the second story with dirt and grime; not to mention a large rock crashed into it.
If someone was to walk through the church, from inside to out, there would be a certain path of least resistance that is probably most taken. I tried to keep that section pretty clear, and worn down, while the rest of the floor is covered with dirt. To add dirt and grime to this Mordheim Church, I tried two different methods:
Applying Dirt Method 1: First, I put some glue direction on the floor, and spread it around the room. I filled in the corners and edges with lots of glue, and spread it around with my fingers. 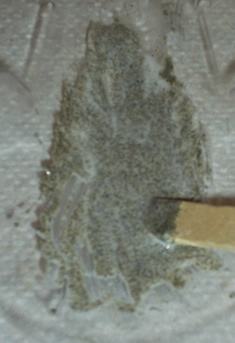 I dropped some wood chips and small wood shavings over the glue. Then I took some fine beach sand I collected at Camp Cherry Valley, and dropped it on the floor. I shook the building a little bit to get the dirt to stick to all of the glue. I needed to do this a couple times to cover all of the glue with sand. After that, I went on to…
Applying Dirt Method 2: Second, I mixed some sand, glue and water together to make a pretty fluid mix of sticky sand. You don’t want it to be too runny or too thick. Then I took a Popsicle stick to spread it around the floor of the building and into the cracks. I ran my finger over the pathway to keep the dirt in the cracks and off the worn path. When I got to the end of my second batch of sand/glue mixture, I used my fingers to rub the leftovers on the walls to add some character.
Here are some pictures of the completed product:

Here’s a close up of one of the corners with dirt and wood:

Next step will be adding the roof tiles. I did forget that I wanted to have some roof tiles in the dirt and grime. Hopefully I’ll be able to add it after the fact.
-Ashton Sanders
Dec 3
Building a Mordheim Deck/Porch
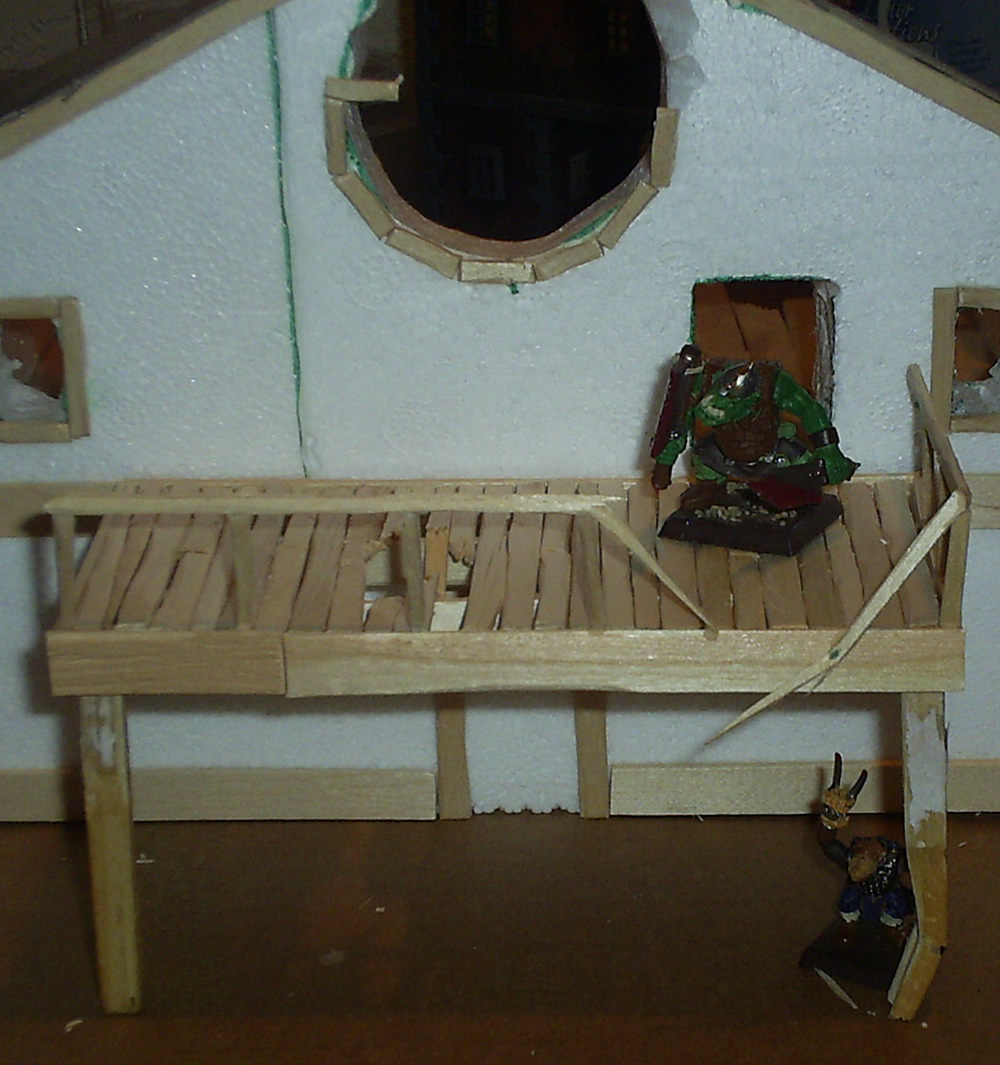
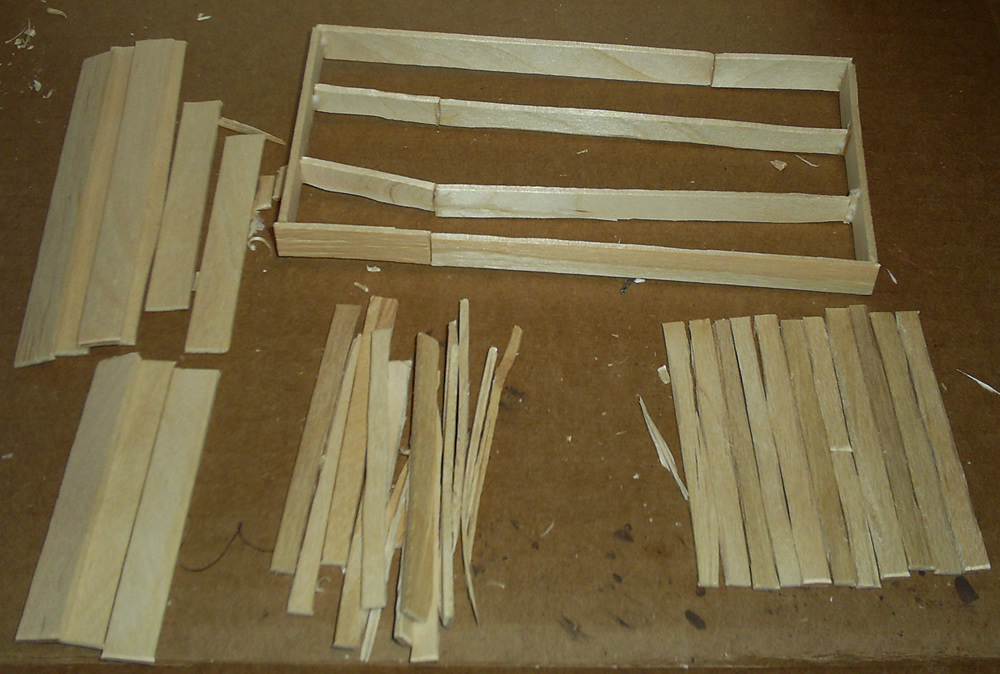 In my latest Mordheim Building post, I discussed creating an entrance at the front of my Church (even though it could easily pass as a tavern, pub or other gathering place). I did quite a number to create this deck. The first thing I did, was figure out how far forward I wanted the deck to be, and then cut up a bunch of Popsicle sticks to fit the proportions. I chose to create the porch 2.7″ deep and almost 7″ wide. To the right you can see my lumber yard, and my sticks in their assorted stages.
First I cut the ~4″ Popsicle sticks down to 2.7″, and then I cut those pieces in half lengthwise to get thinner planks. I also used some of the 1.5″ pieces as planking. I scraped my knife over every edge of each plank to add “character.”
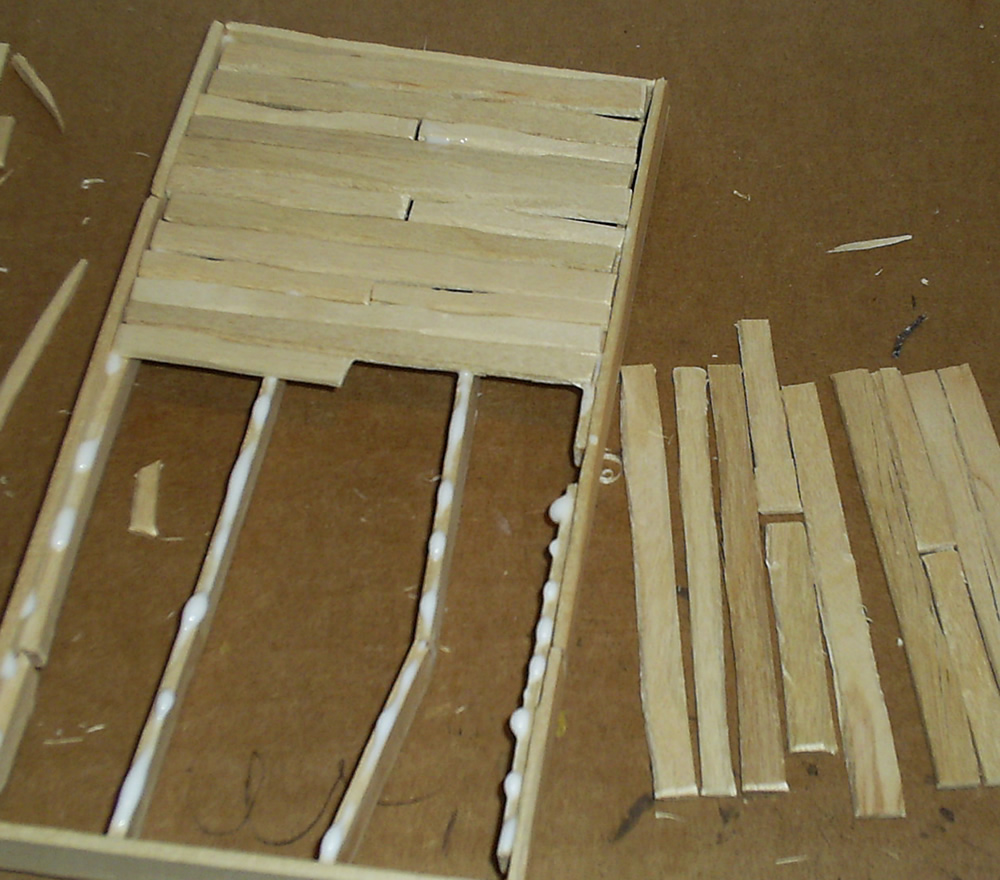 You can see in this next picture the frame I created for my Mordheim Deck. The four beams that are on the inside of the deck are suck down to allow the planks on top to sit level with the top of the outside planking.
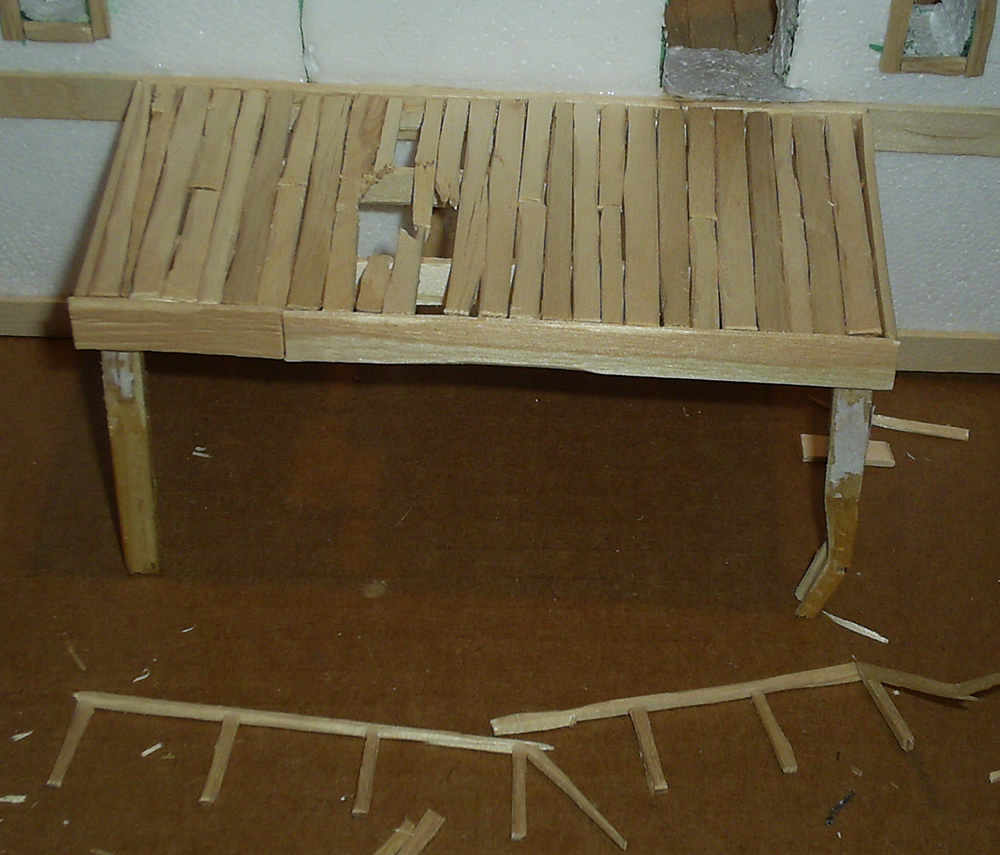
After getting half way through creating this deck, I realized I hadn’t properly destroyed the deck. Even though the front side of the Mordheim Church hadn’t been hit too hard by falling debris from the comet, it’s in the City of the Damned, so I couldn’t leave it totally untouched.
Here’s my new deck; complete with hole, wreaked post and destroyed handrails. I’ll probably be adding some more grunge, dirt and debris after I finish framing the door and windows (on the left side of the building).
I can’t think of anything else to add to this building, so I’ll probably work on a couple other of my unfinished Mordheim projects before starting the painting on this Mordheim building.
-Ashton Sanders
Nov 29
First Completed Mordheim Building
I have finally completed my first Mordheim building. I started this building at about the same time I started this blog, so it’s been two weeks in the making. In my defense, this Mordheim building isn’t the only Mordheim project I’ve been working on.
I decided to go with a yellow paint with wooden accents. Here is the completed Mordheim building:
Here are the two outside walls. Click on the image to view larger image.
I’ll be putting up another image of the “gravel pile” on the second floor. I need to get a good picture with normal daylight.
I think for my first building, it came out very well. The only problem with this Mordheim building is that its scale is too large. Where Mordheim Models are 28mm, this building is closer to 38mm. When compared to the 3-story tavern/building that comes in the Mordheim box, they are almost the same height. The second story floor of this yellow Mordheim building comes up to the windows on the second floor of the original Mordheim building. The window and door on my building are also too large.
Notes to keep in mind,
Ashton Sanders
Nov 25
To Add a Base or Not to Add a Base
(That is the question…)
I’ve been toying with the idea of adding bases to my buildings. I am almost ready to add a coat of paint to my first Mordheim Building, and I need to decide whether or not I want to add a base to it. Here’s a picture of a Mordheim building with a base, and you can click on the link to my first Mordheim Building above to see a building without a base.
The Pros of adding a base to your Mordheim building:
- When a building has a base, it is much easier to add debris and trash to the floor around the building.
- It also adds a lot of stability to your building. It is much easier to keep your building from falling over from the weight of your Mordheim Models.
- You can use them to add hills and elevation to your Mordheim Board. I can guarantee the City of the Damned is not totally flat.
The Cons of adding a base to your building:
- You get that annoying lip around the edge of the base that can distract from.
- The base can easily end up as a different color than the board you are playing on. (Use a friends board, make a new one, etc.) I’m trying to build these buildings for aesthetics, this will cause them to look very ugly. Here’s an example of Mordheim bases looking ugly.
- Buildings with bases cannot be placed very close together, so if you are playing the “Street Fight” scenario, you will have trouble making a wall of buildings.
Can you think of any other Pros or Cons? I’ll try to update this list.
I think I will end up adding small bases to some of my buildings, but I’ll have to work on camouflaging the bases really well, and I’ll probably need to put together a board first. Does anyone know where I can find a tutorial about how to create a Games Workshop or Mordheim Board (with the sand on it)?
-Ashton Sanders
UPDATE: For a more detailed post on this subject check out my newer post: Adding Bases to Terrain.
Nov 15
Mordheim Construction – Cutting Foam
In my earlier post I described how I had been cutting foam. It was a slow and tiring process.
Yesterday, I went to a couple hobby shops in Kalispell. I purchased my very first Woodland Scenics Hot Wire Foam Cutter.

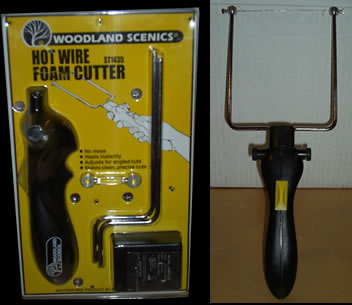
All you do is plug it into the wall, and press the yellow thumb-trigger forward, and “Voila” You have a pipin’ hot wire that glides through foam like a hot knife through… butter… (I know, that wasn’t much of an analogy, but I couldn’t think of anything else.) It works pretty well too. This foam cutter gives you a little under 4 customary inches of hot wire to cut with. So don’t get a 5″ cube, or you’ll only cut off the corners. Here is the first victim of my new tool:
My Second Mordheim Building (before and after):
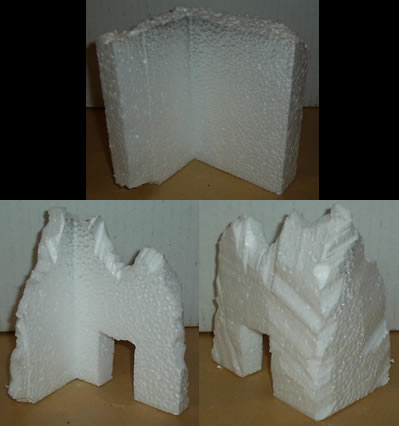
Look at that character! Both of the walls had been different sizes (one was almost twice the size of the other). Using this foam cutter, I was able to make both walls the same size, and add a good deal of character with ease. The only problem with cutting foam with a hot utensil, is the toxic fumes, so be sure to always use a hot foam cutter in a well ventilated area.
-Ashton Sanders
Nov 15
Mordheim Building – Floor Tiles
I’ve done some more work on my first Mordheim Building.
First, I added wood plants as floorboard to the second story floor. I didn’t have any balsa wood handy, so I used some thin cardboard and cut them into 1×12* strips. I had to be pretty inventive to try to make the broken ends of the cardboard actually look like wood. I tried to splinter the cardboard to make it look like very broken/thrashed wood.
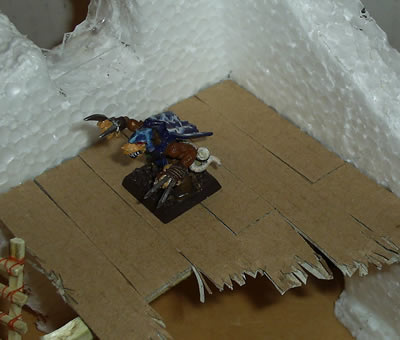
Second, I cut a 4×4* support beam, and glued it to the bottom of the cardboard. Even though these houses were not built to withstand a comet, they were built to withstand normal human and furniture weight.
Third, I took a small piece of clear fiberglass, cut it to be a broken piece of glass and inserted it as a broken piece of glass in the window.
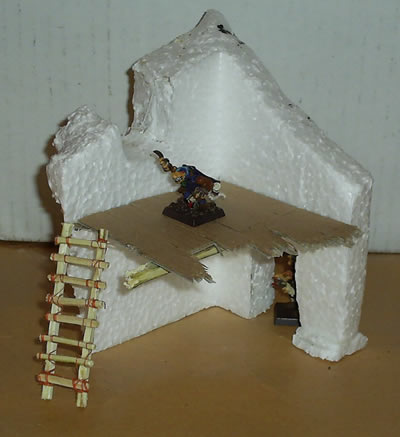
(Kitves, the Eshin Sorcerer, and Nutz, the youngblood, volunteered for this photo.
You can also see my homemade Mordheim Ladder)
This building is definitely coming along much better than I thought it would. Now I just have to do the finishing touches and get some paint on it. I went to a hobby shop yesterday and got some tips on how to paint Styrofoam, because it can definitely be a pain.
-Ashton Sanders
*This is in miniature scale. So 4×4 beam would be a 4 inch by 4 inch beam to a Mordheim model. This more like 4 mm to normal humans.
