Nov 16
Experimenting with Mordheim Shrubs
Most Mordheim Boards don’t have any sort of plant life or shrubbery, which is probably from the thick cloud of ash and poison that hangs over the City of the Damned. But I disagree. After the comet crashed into the city of Mordheim, it annihilated a good portion of the inhabitants instantly, and the survivors started mutating and going crazy. I figure this would be about the same process of the plant life.
I have another reason to want plant life on my Mordheim board: I have lots of creepy looking weeds, that could fit in very well to my Mordheim board and add a lot of character.
That said, lets move on to making my second Mordheim plant. This one is going to be a shrub, since my Mordheim Tree was too freaking huge. I started with the same tumble weed that I made my tree with. I clipped off a small group of the branches and stuck them into a piece of cardboard. I soon discovered how horrible this idea was. Below you can see the plant I used, and what it made. I quickly threw away the idea of using that plant for a shrub. Here is my Shrubbery FAILURE:
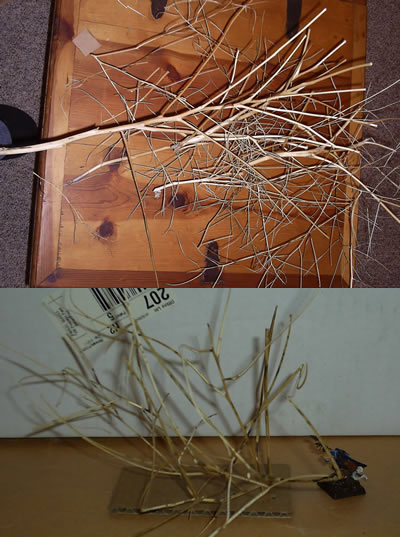
But I didn’t give up yet. I knew something cool could come from all these creepy weeds I have in my yard. I tried my next weed, which is a noxious weed. This one has creepy pod like flowers that don’t ever wilt away. I cut the pods off and stuck them into a piece of cardboard. I think it may have been too much, but it’s a great start. I added a layer of Elmer’s Glue to the floor to hold the plants in place.
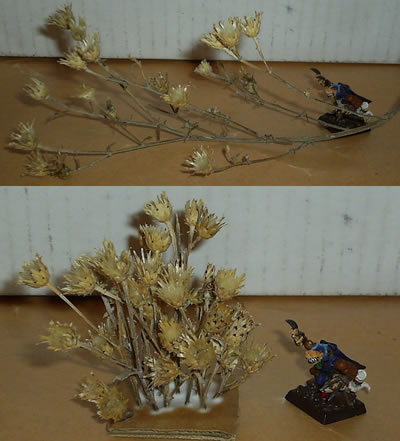
I don’t know if I’ll ever use that shrub, but it was a good start, and I’ll be developing more shrub-like plants soon.
-Ashton Sanders
Nov 15
Mordheim Construction – Cutting Foam
In my earlier post I described how I had been cutting foam. It was a slow and tiring process.
Yesterday, I went to a couple hobby shops in Kalispell. I purchased my very first Woodland Scenics Hot Wire Foam Cutter.

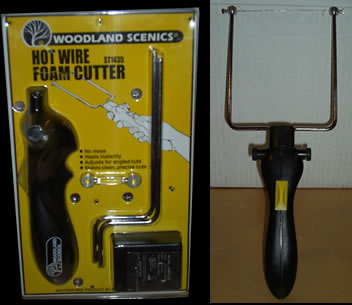
All you do is plug it into the wall, and press the yellow thumb-trigger forward, and “Voila” You have a pipin’ hot wire that glides through foam like a hot knife through… butter… (I know, that wasn’t much of an analogy, but I couldn’t think of anything else.) It works pretty well too. This foam cutter gives you a little under 4 customary inches of hot wire to cut with. So don’t get a 5″ cube, or you’ll only cut off the corners. Here is the first victim of my new tool:
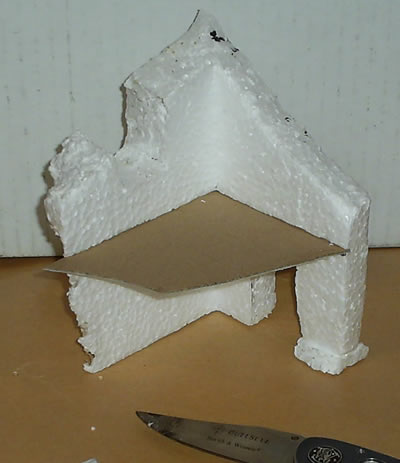
My Second Mordheim Building (before and after):
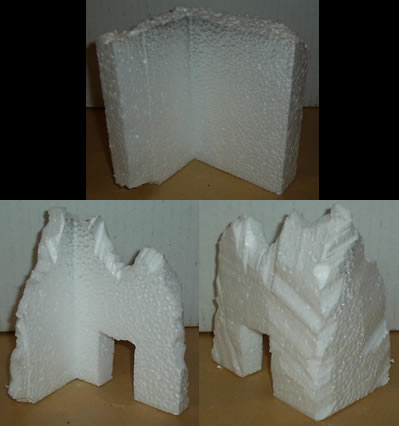
Look at that character! Both of the walls had been different sizes (one was almost twice the size of the other). Using this foam cutter, I was able to make both walls the same size, and add a good deal of character with ease. The only problem with cutting foam with a hot utensil, is the toxic fumes, so be sure to always use a hot foam cutter in a well ventilated area.
-Ashton Sanders
Nov 15
Mordheim Building – Floor Tiles
I’ve done some more work on my first Mordheim Building.
First, I added wood plants as floorboard to the second story floor. I didn’t have any balsa wood handy, so I used some thin cardboard and cut them into 1×12* strips. I had to be pretty inventive to try to make the broken ends of the cardboard actually look like wood. I tried to splinter the cardboard to make it look like very broken/thrashed wood.
Second, I cut a 4×4* support beam, and glued it to the bottom of the cardboard. Even though these houses were not built to withstand a comet, they were built to withstand normal human and furniture weight.
Third, I took a small piece of clear fiberglass, cut it to be a broken piece of glass and inserted it as a broken piece of glass in the window.
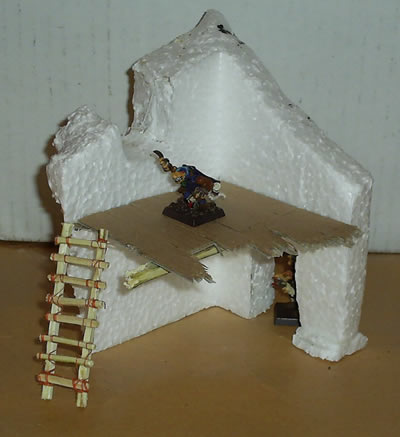
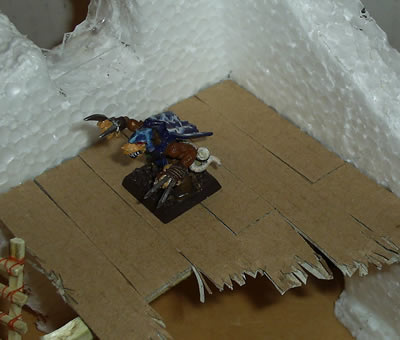
(Kitves, the Eshin Sorcerer, and Nutz, the youngblood, volunteered for this photo.
You can also see my homemade Mordheim Ladder)
This building is definitely coming along much better than I thought it would. Now I just have to do the finishing touches and get some paint on it. I went to a hobby shop yesterday and got some tips on how to paint Styrofoam, because it can definitely be a pain.
-Ashton Sanders
*This is in miniature scale. So 4×4 beam would be a 4 inch by 4 inch beam to a Mordheim model. This more like 4 mm to normal humans.
Nov 14
Mordheim Tree – Cut Down to Size
So my first experiment with a Mordheim Tree didn’t turn out as well as I’d hoped, so I decided to do some modifications. I have trimmed down the trees to a much more reasonable height. I will definitely have to add something to the limbs as they are very empty. I have been thinking about hanging a skeleton in a noose, or maybe some sort of creature’s nest.
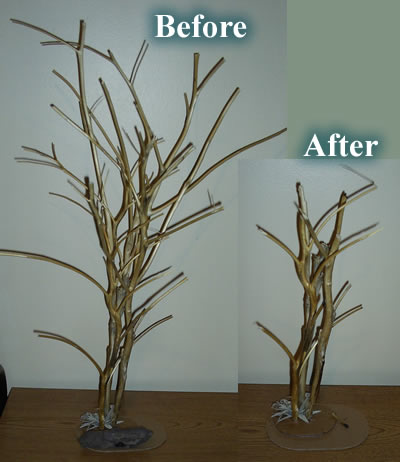
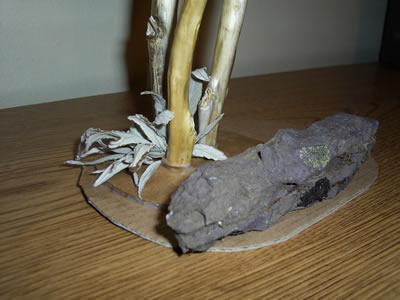
You can also see in this picture that I created a small bush growing at the base of the trees. I found a plant with small pointy leaves, and dried it. Once the leaves were totally dried, I pulled them off, and stuck them together into a pile of Elmer’s glue. As the leaves got thicker, it started to look more and more like a yucca/fern type plant. Definitely something created by the wyrdstone.
Who knows how the Mordheim tree will actually turn out?
Definitely not me
-Ashton Sanders
Nov 13
Mordheim Trees
On most Mordheim Tables, there are very few trees. Actually, I think I’ve only seen one Mordheim Table that had a tree, and it was approximately 3 inches tall.
I realize these trees are Redwood-size, and following the story line of Mordheim, there really is no way they could have survived the impact of a two-tailed comet. “So What?” This is my first one, so I’m testing it out.
I found a tumble weed that has a cool, thick trunk, and it looks like a great miniature tree. Here are the pictures of my first set of Mordheim Trees:
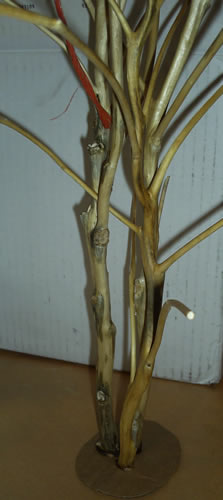
I cut three perfectly sized holes in this small piece of cardboard, and stuck in the trunks of the three tumble weeds. I placed this normal cardboard onto a thin piece of thick board and glued it with super glue and Elmer’s Glue. I used the Elmer’s to smooth out the edges of the cardboard.
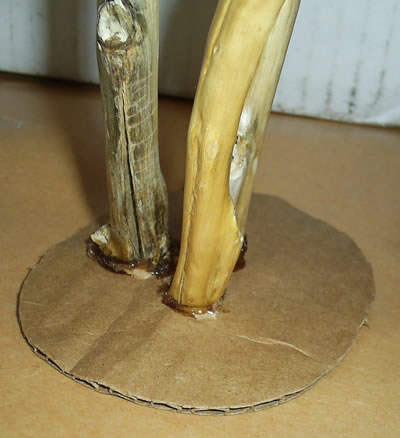
I used bailing twine (orange string) to tie the tops of the trees together to keep them in place while I glued the branches that touched to stabilize it.
Yes, I realize they are FREAKING HUGE.
-Ashton Sanders
Nov 12
Mordheim Ladder
My next project was to build a Mordheim Ladder without spending any money.
- I found a thin tree branch sitting in my driveway. It was still fairly green and made of good, hard wood.
- I cut two of the branches into pieces the same length as the normal Mordheim ladder and shaved them into long rectangles (as opposed to cylinders). I cut 8 much smaller rectangles to be used for the rungs of the ladder.
- I glued the pieces together with Elmer’s Glue.
Here you can see the progression from branch to rectangle to ladder.
- You will also notice in this picture, a long orange string. This I glued into place at the top of the ladder to be used as the lashing rope. (Skaven don’t glue ladders together, they use lashings.) This orange string is actually one thread of bailing twine (what holds bails of hay together).
- After the glue dried, I lashed the ladder rungs together. (I used tried to make it as unorganized as possible, although looking at this ladder, it’s much nicer than a clan of rats (or Orcs) would ever take the time to make… I’ll have to say it’s just sloppy humans.)
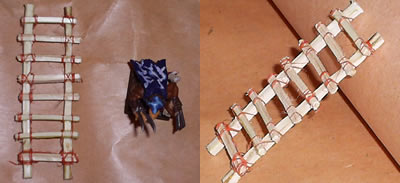
Now all i have to do is stain/paint it.
-More to come
–Ashton Sanders
Nov 11
First Destroyed Building Section
Welcome to this post on my First Mordheim Building. (Click to view all posts for this Mordheim Building.)
I’ve spent the last couple months saving all of the packing foam/material I could find. Now I’ve got a couple boxes full of Styrofoam, and finally have some time to test it out. I remember having trouble with Styrofoam because of how it reacts with both spray paint and some types of glue.
I started with a thin yet tough piece of cardboard (from a Logitech Speaker box) and a edge section of Styrofoam:
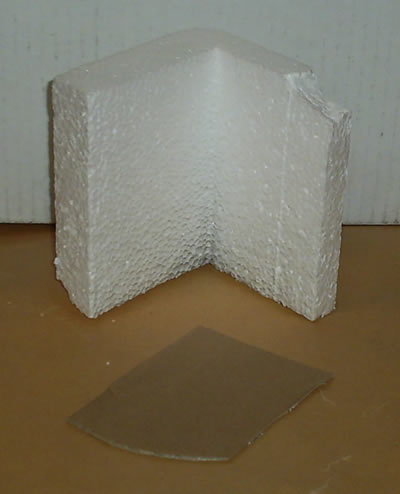
I took an old pocketknife I had lying around, and heated it over the fire on my stove. When it was hot, I’d make a quick cut through the foam. Then, I’d repeat the process. This is great for making straight cuts for doors, windows and the like.
If you’re looking at destroying an entire wall, probably the easiest way I’ve found is to break/cut off the section. This will make lots of loose foam bubbles and your wall will look like foam. To smooth out the foam, just hold it over some heat. This will melt all of the loose foam pieces and create a fairly smooth wall.
To get the piece of cardboard into place, I first drew a straight line with a marker, and then using my hot-knife technique, I cut along the line. This left a perfect slot to slide the cardboard into.
More to come,
-Ashton Sanders
Nov 10
Mordheim Blog – Intro
Hello and welcome to Ashton Sanders’ Mordheim Blog.
My plans for this Mordheim Blog is to document many of the different aspects of Mordheim, the “Specialist Game” developed by Games Workshop. Their most popular games are Warhammer Fantasy and Warhammer 40,000 (40k), but both of these games require hundreds of models, and I’ve never been interested in spending the rest of my life painting the same colors on the same models.
So I started playing Mordheim, where instead of armies; you fight with warbands of 5-20 models. There is also more terrain (usually) in Mordheim, which can be very fun to create. Unfortunately, there really isn’t a good website dedicated to Mordheim, so I plan on putting one together. This is the beginning of it.
I plan on updating this blog with everything having to do with Mordheim, whether it’s creating buildings, designing unique terrain, painting models, or just playing the game. I currently have a Skaven warband and an Orc and Goblin warband. (Both of which could use improved paint jobs.)
That sounds like I’ve covered everything. I hope you enjoy my blog.
-Ashton Sanders
