May 21

Wyrdstone

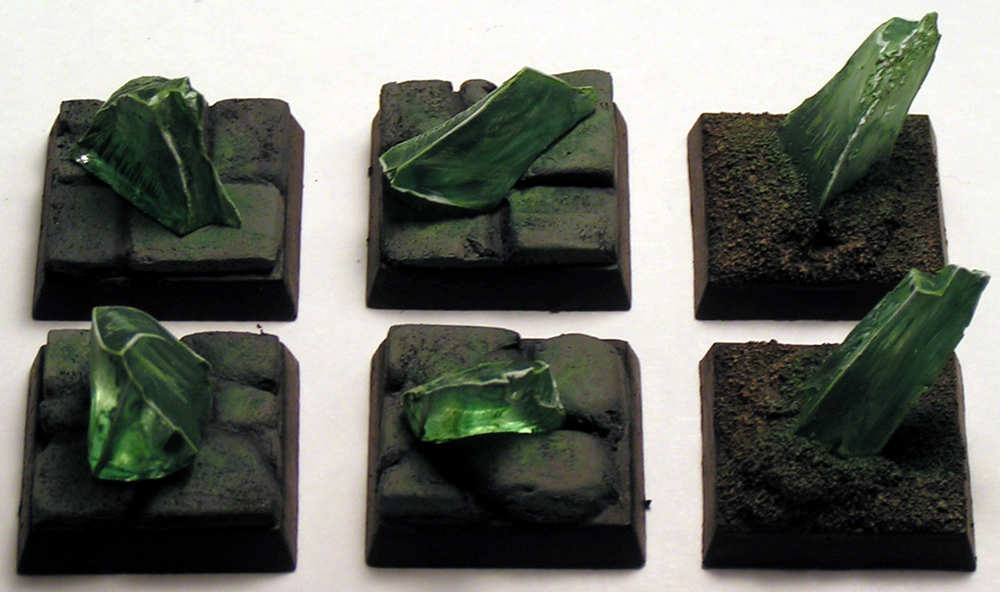
In my cruising through random Mordheim pictures, I saw a picture of some custom(?) wyrdstone counters that seemed to be made out of plastic. They just looked like large green rocks, and I remembered that I had started putting together some wyrdstone counters when I was playing the game (in 2000?). Being a packrack, I still had a couple zip lock bags in my Mordheim Box! So, I pulled them out, and put together these sweet Wyrdstone Counters:

Wyrdstone Counters by Ashton Sanders

Mordheim Wyrdstone Counters
Click to Enlarge


How to Make Cool Wyrdstone Counters
by Ashton Sanders

These Wyrdstones are made out of pieces of broken (window?) glass. This is definitely the hardest part of making these counters: Finding broken glass. I was lucky enough to happen upon a pile of broken glass on the street outside of my house (when I was living in LA), and I instantly knew what I was going to do with them. I took a handful (careful not to cut myself of course) and put them in a plastic bag.

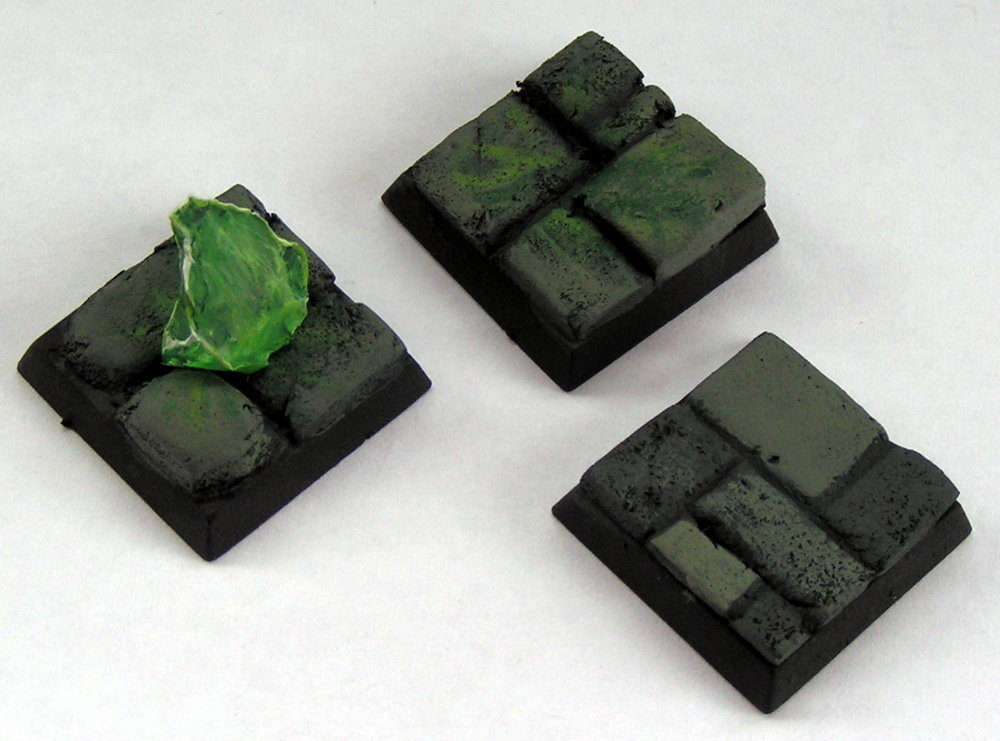
I have tried to do a number of different things with my broken glass, and finally (now that I’m “grow’d up”) I have created the effect I was looking for. As you can tell from the pictures above, I used a couple different kinds of bases (dirt and cobblestone). Here is how I created them (dirt one first).

Step 1) If you want your Wyrdstone shard to be embedded in the base, and glue it to your base now. I used Super Glue.

Basing Wyrdstone Counters

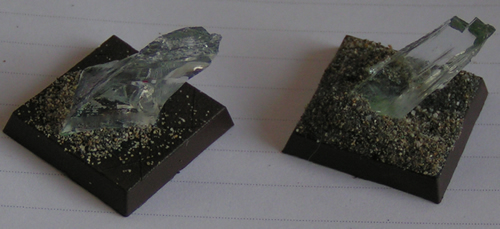
Step 2) Glue on a pile of dirt (fine sand) around your shard. (I made mine look like they hit the ground at an angle, so I piled up a bunch of dirt on all but one side of the shard.)

Step 3) Paint the shard with a very watery dark green wash. (I used watered down green paint.)

Basing Wyrdstone Counters
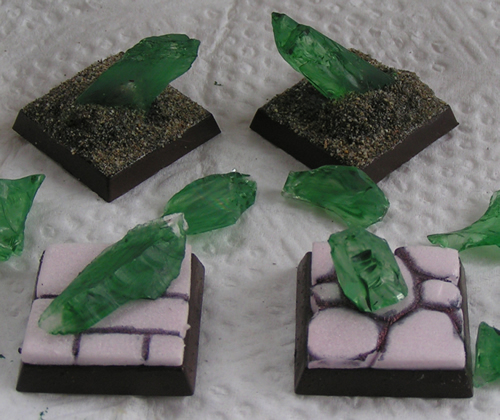
(You can see two more bases I created out of pink foam. Note: Don’t use Super Glue or Rubber Cement (etc.) on Pink foam)

Step 4) Paint the base as you normally would.

Step 5) Now you need to make the Mordheim wyrdstone look like it glows. You do this in two ways:

5A) First, highlight the all of the sharp edges of the rock with two shades of lighter and lighter green, then highlight *portions* of the edges with white.

5B) Second, very lightly drybrush the center of the base (around the wyrdstone) with a couple shades of green. This is to make the rock look like it’s shining light onto the ground around it.

Mordheim Wyrdstone Glowing Techniques
Click to Enlarge

Step 6) If you haven’t done so yet, glue the shard to your base. Since I used Pink foam for this base, I couldn’t use super glue. I didn’t think PVA (white) glue would do the trick, but I have used it, and it seems to be working great! (I will update here if I run into any problems after I have used my Mordheim Wyrdstone Counters a bunch.)

And you’re done! I hope that helps in making some bad-ass Wyrdstone Counters.
-Ashton Sanders

(P.S. There are two problems with this tutorial that I need help with: 1) *Updated above* 2) I need to figure out a way to “seal” the paint on the glass so it doesn’t get rubbed off from handling. What do you use? Thanks for your help.)

(P.P.S. Mordheim Regulations require me to include the following warning on any page mentioning Wyrdstone:

SURGEON GENERAL’S WARNING: Wyrdstone can cause dry skin, vomiting, diarrhea, insomnia, hallucinations, constant mumbling, mutations, loss of sanity, extra limbs, death and even undeath. Always consult your priest before becoming addicted to Wyrdstone.)

20
Tags: Mordheim, Turorial, Wyrdstone,

20 Comments so far

  1. Jeffrey Kauffman May 21st, 2008 6:20 pm

    i work as a scenic carpenter (for a theatre) and the one method we have for gluing pink foam is ‘liquid nails’ which is a construction adhesive that comes in a tube, much like silicon caulking (for windows, etc.) would. We’ll occasionally also use a modeller’s clay called either ‘das’ or ‘das prontos’, which to my recollection seems to adhere fairly well to foam.

    Liquid nails is pretty nasty, don’t use anything valuable to spread it with, and keep it off your clothes, but you at least don’t need to wear a vaporizer to use it.

    Das is simply clay that’ll set and harden after a day or so.

    I’d have a few other suggestions that are fairly toxic, and perhaps a little harder to come by…

    I haven’t used any of these for mordheim projects yet, but i’m planning to eventually…
    -jeffrey

    There are a couple other methods

  2. Jeffrey Kauffman May 21st, 2008 6:21 pm

    oops, missed an edit at the end there.

    These look awesome by the way. keep up the good work!

  3. Sean Jennison May 22nd, 2008 5:38 am

    The counters look great, I love the glowy effect by dry brushing the base around the stone. I will certianly use that technique in my models. I love the flexibility of pink foam, and it’s my material of choice for alot of my terrain. But when I deal with small bases like your counters I would go with green stuff (epoxy putty). You can use cy glue with it, and you once you have the base covered you can stick the glass right into the putty. Then its really easy to model a small crater around the shard of glass. Or you can carve cobble stones or brick in seconds. Then once your pattern is done just run a small bead of glue around the base of the glass to secure it. Once the putty sets it will be as hard a stone!

  4. Ashton Sanders May 22nd, 2008 7:55 am

    Thanks for the comments guys. Very good points. I’ll definitely try them out. (I just got some Green Stuff the other day, too. I should get started =])
    -Ashton Sanders

  5. Heinyken May 22nd, 2008 12:17 pm

    Ash,
    My jaw literally dropped open when I saw these counters! I don’t friggen believe how good these look! Do you remember Garrett’s? They were carved foam that looked like — well, foam. These are crazy good! Wow, man. Just wow. Well done on this.
    Something you might consider doing, since you are working with broken glass, is try to work out a way to buff all the edges, since it would really suck to be mid-game, energetically reaching for a counter, and get a slice down your finger.
    I was thinking that holding the glass with pliers and sandpapering the edges would probably work pretty well.
    Great job, Ash!
    -TRoss-

  6. Ashton Sanders May 22nd, 2008 12:31 pm

    Thanks TRoss! Haha, no I don’t remember Garret’s counters. lol

    Oh yea, I forgot to mention that.

    I haven’t done anything to the actual glass (besides paint it), and they really aren’t sharp. It may be because I had them all together in a plastic bag for 7 years and had enough bouncing against each other to dull the edges. I’ve rubbed them between my hands, with no cuts.

    You’d really have to slam your hand down hard on it to get a cut. You’d probably prick yourself on a metal sword before you cut your self on these Wyrdstone counters.

    *UPDATE: See SURGEON GENERAL’S WARNING above.

  7. Heinyken May 24th, 2008 10:09 am

    Ah. Well, yes, that would change things, wouldn’t it? I wonder what the case would be for some new, recently broken glass?
    And is that actually from the Mordheim rulebook or something? That’s a great quote! I love the ending: “may cause death, or even undeath.” Haha!
    Well, thanks for the clarification on the edges, that certainly explains why you, an uber-safe Eagle Scout gun-safety-guru (sorry, but the title of gun-safety-nazi goes to Kenny T), didn’t seem to buff the edges so as not to kill your 8 year-old Mordeim buddy.
    -TRoss-

  8. Ashton Sanders May 24th, 2008 10:11 am

    Haha, no I just made it up, lol. Thanks.

    lol
    -Ashton Sanders

  9. Smoth December 5th, 2008 9:55 am

    Great stuff, to those wondering about broken glass, I have always been able to get it on college campuses. Cars get broken into and this shattered glass is easy to find. I use GOOP to glue it down. Tamiya makes this translucent green paint that I used to make green crystals.

    I never though of using it as wyrdstone though! Good idea!

  10. Killer Shrike December 15th, 2008 11:42 am

    Very nice wyrdstones.

  11. Ben January 10th, 2009 2:34 pm

    It occurs to me that it might have been easier to just use green glass rather than painting it. Grab a beer bottle, put it in a plastic bag (maybe two bags, actually) then break the glass by hammering the bag. Sorted!

  12. Evil Jim June 29th, 2009 7:49 pm

    You could also look at a craft store like Michael’s. They sell glass for mosaics that is pretty randomly broken. It’s pretty cheap too.

  13. Vapolution vaporizer July 1st, 2009 8:56 pm

    they are so cute! Very nice wyrdstones! Now i know how to make mine.thank you so much for sharing us on how to make wyrdstone. maybe i can make a wyrdstone a business. Its cool!

  14. Jacin September 11th, 2009 10:12 am

    @Ben - I was thinking that green glass might take a step out of the process, too. I might give that a shot and see how it looks.

  15. Ashton Sanders September 11th, 2009 10:43 am

    Re: Green Glass. Yea, that sound workable. The glass shards will be thinner than these, but you may like them smaller.

    Let me know how they end up looking.

  16. Vince September 22nd, 2009 10:46 am

    Woah Ashton,

    You truely did a great job here. The broken glass from L.A. might even have it’s own history of violence (and maybe even death) when you come to think about it.
    I’m sure to keep this technique in mind when I’m making my own wyrdstone. Thanks for sharing!

    - Vince

  17. ASEO December 19th, 2009 9:12 pm

    Awesome…Off to local thrift store to buy something made of thick glass to break…

    ASEO out

  18. Jace May 26th, 2010 7:55 pm

    I know this comment is late, but I wanted to say how fantastic these counters look! They’re amazing!

    I took an old drinking glass with a thick, heavy bottom and smashed it in a bucket, then spread out the pieces on my driveway. I took the biggest ones and very carefully chipped them down using a hand hatchet, which allowed me to achieve some pretty cool looking angles. After all was said and done, I had 20+ good sized and good looking pieces to work with. I took 12 of them and glued them to bases to make counters, and I’m keeping the other 8 around just in case.

    One thing I wanted to mention was that in the tutorial, you say to glue the shards to the bases very early on, and then say to glue them to the bases again later, after painting the bases green. Might want to go back and edit that.

    The effect really is amazing, though. It’s such a good idea. Thanks so much!

  19. Ashton Sanders May 26th, 2010 10:21 pm

    Thanks for the compliments and the note.

    I have updated the gluing steps to make a little more sense.

    I’d love to see how your Wyrdstone came out.

  20. Jace May 28th, 2010 10:31 am

    I think a darker base shade of green would have produced a more sinister, darker shard. I went with watered down Goblin Green, and next time I’m thinking more like Dark Angels green.

Leave a Comment